By: Team F09-03 Since: Aug 2018 Licence: MIT
- 1. Introduction
- 2. Setting up
- 3. Design
- 4. Implementation
- 4.1. Filter feature
- 4.2. Find feature
- 4.3. Add/Delete Event feature
- 4.4. Edit Event feature
- 4.5. Email Functionality
- 4.6. Import/Export Command
- 4.7. Mark/Unmark Command
- 4.8. Extension made to add_guest: Generate Unique ID (UID) on creation of an entry into the list
- 4.9. [Proposed] Data Encryption
- 4.10. [Proposed] Guest Email Verification
- 4.11. Logging
- 4.12. Configuration
- 5. Documentation
- 6. Testing
- 7. Dev Ops
- Appendix A: Product Scope
- Appendix B: User Stories
- Appendix C: Use Cases
- C.1. Use case: Import guest data and update payment status
- C.2. Use case: Input event details and edit venue details
- C.3. Use case: Filter guest list based on status of payment and mass email those who have not paid
- C.4. Use case: Filter based on specific requirements and mass email all guests
- C.5. Use case: Review guest details while organising the event
- C.6. Use case: Sending tickets to individual guests
- C.7. Use case: Providing smooth registration on the day of the event
- C.8. Use case: Importing large number of guests into the guest list of an event
- C.9. Use case: Export guest list of an event (to CSV file format)
- Appendix D: Non Functional Requirements
- Appendix E: Glossary
- Appendix F: Instructions for Manual Testing
- F.1. Launch and Shutdown
- F.2. Filtering a guest
- F.3. Finding a guest
- F.4. Adding event details
- F.5. Deleting event details
- F.6. Editing event details
- F.7. Sending individual emails
- F.8. Sending all guests an email
- F.9. Sending a group of guests an email
- F.10. Importing and exporting guests
- F.11. Guest preview
- F.12. Generation of UID details in add_guest command
- F.13. Marking Attendance details
- F.14. Add tags to all guests in the list
- F.15. Remove tags from all guests in the list
1. Introduction
Invités is an application targeted at event managers and planners. The application allows its users to efficiently organise, cater, and manage large events such as weddings, school gatherings, orientation camps, etc. Some of the main features include the ability to send mass emails, keep track of payments, and take note of attendance of the guests. To add to these features, by employing a standardised format, the application is able to take in Comma Separated Values (CSV) files and import the guest list for a particular event. This eliminates the need to key in the guest details manually and subsequently, gives users an alternative if they decide to organise another event using the same guest list. This guide provides information that will help you get started as a contributor to this project. If you are already a contributor to the project, you will find it useful to refer to this guide.
2. Setting up
2.1. Prerequisites
-
JDK
9or laterJDK 10on Windows will fail to run tests in headless mode due to a JavaFX bug. Windows developers are highly recommended to use JDK9. -
IntelliJ IDE
IntelliJ by default has Gradle and JavaFx plugins installed.
Do not disable them. If you have disabled them, please go toFile>Settings>Pluginsto re-enable them.
2.2. Setting up the project in your computer
-
Fork this repo, and clone the fork to your computer
-
Open IntelliJ (if you are not in the welcome screen, click
File>Close Projectto close the existing project dialog first) -
Set up the correct JDK version for Gradle
-
Click
Configure>Project Defaults>Project Structure -
Click
New…and find the directory of the JDK
-
-
Click
Import Project -
Locate the
build.gradlefile and select it. ClickOK -
Click
Open as Project -
Click
OKto accept the default settings -
Open a console and run the command
gradlew processResources(Mac/Linux:./gradlew processResources). It should finish with theBUILD SUCCESSFULmessage.
This will generate all resources required by the application and tests.
2.3. Verifying the setup
-
Run the
seedu.address.MainAppand try a few commands -
Run the tests to ensure they all pass.
2.4. Configurations to do before writing code
2.4.1. Configuring the coding style
This project follows oss-generic coding standards. IntelliJ’s default style is mostly compliant with ours but it uses a different import order from ours. To rectify,
-
Go to
File>Settings…(Windows/Linux), orIntelliJ IDEA>Preferences…(macOS) -
Select
Editor>Code Style>Java -
Click on the
Importstab to set the order-
For
Class count to use import with '*'andNames count to use static import with '*': Set to999to prevent IntelliJ from contracting the import statements -
For
Import Layout: The order isimport static all other imports,import java.*,import javax.*,import org.*,import com.*,import all other imports. Add a<blank line>between eachimport
-
Optionally, you can follow the UsingCheckstyle.adoc document to configure Intellij to check style-compliance as you write code.
2.4.2. Updating documentation to match your fork
After forking the repo, the documentation will still have the SE-EDU branding and refer to the se-edu/addressbook-level4 repo.
If you plan to develop this fork as a separate product (i.e. instead of contributing to se-edu/addressbook-level4), you should do the following:
-
Configure the site-wide documentation settings in
build.gradle, such as thesite-name, to suit your own project. -
Replace the URL in the attribute
repoURLinDeveloperGuide.adocandUserGuide.adocwith the URL of your fork.
2.4.3. Setting up CI
Set up Travis to perform Continuous Integration (CI) for your fork. See UsingTravis.adoc to learn how to set it up.
After setting up Travis, you can optionally set up coverage reporting for your team fork (see UsingCoveralls.adoc).
| Coverage reporting could be useful for a team repository that hosts the final version but it is not that useful for your personal fork. |
Optionally, you can set up AppVeyor as a second CI (see UsingAppVeyor.adoc).
| Having both Travis and AppVeyor ensures your App works on both Unix-based platforms and Windows-based platforms (Travis is Unix-based and AppVeyor is Windows-based) |
2.4.4. Getting started with coding
When you are ready to start coding,
-
Get some sense of the overall design by reading Section 3.1, “Architecture”.
-
Take a look at Appendix A, Product Scope.
3. Design
3.1. Architecture

The Architecture Diagram given above explains the high-level design of the App. Given below is a quick overview of each component.
The .pptx files used to create diagrams in this document can be found in the diagrams folder. To update a diagram, modify the diagram in the pptx file, select the objects of the diagram, and choose Save as picture.
|
Main has only one class called MainApp. It is responsible for,
-
At app launch: Initializes the components in the correct sequence, and connects them up with each other.
-
At shut down: Shuts down the components and invokes cleanup method where necessary.
Commons represents a collection of classes used by multiple other components. Two of those classes play important roles at the architecture level.
-
EventsCenter: This class (written using Google’s Event Bus library) is used by components to communicate with other components using events (i.e. a form of Event Driven design) -
LogsCenter: Used by many classes to write log messages to the App’s log file.
The rest of the App consists of four components.
Each of the four components
-
Defines its API in an
interfacewith the same name as the Component. -
Exposes its functionality using a
{Component Name}Managerclass.
For example, the Logic component (see the class diagram given below) defines it’s API in the Logic.java interface and exposes its functionality using the LogicManager.java class.

Events-Driven nature of the design
The Sequence Diagram below shows how the components interact for the scenario where the user issues the command delete 1.

delete_guest 1 command (part 1)
Note how the Model simply raises a AddressBookChangedEvent when the Address Book data are changed, instead of asking the Storage to save the updates to the hard disk.
|
The diagram below shows how the EventsCenter reacts to that event, which eventually results in the updates being saved to the hard disk and the status bar of the UI being updated to reflect the 'Last Updated' time.

delete_guest 1 command (part 2)
Note how the event is propagated through the EventsCenter to the Storage and UI without Model having to be coupled to either of them. This is an example of how this Event Driven approach helps us reduce direct coupling between components.
|
The sections below give more details of each component.
3.2. UI component
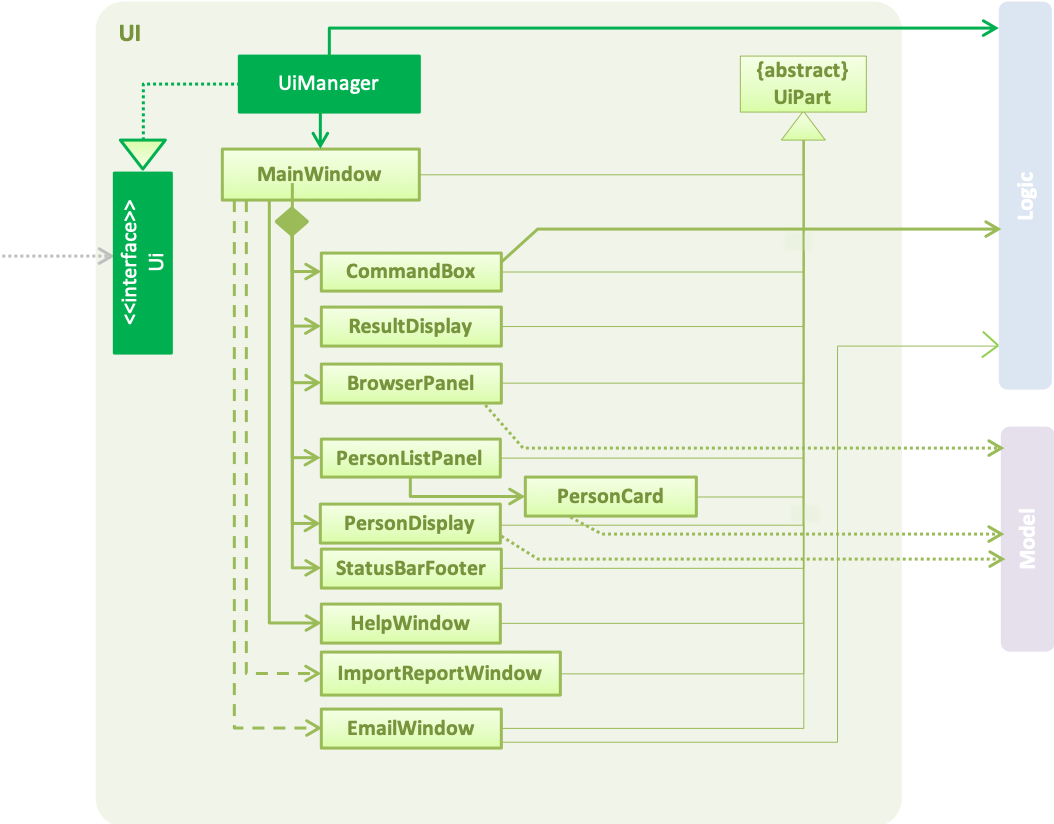
API : Ui.java
The UI consists of a MainWindow that is made up of parts e.g.CommandBox, ResultDisplay, PersonListPanel, StatusBarFooter, EventDetailsPanel etc. All these, including the MainWindow, inherit from the abstract UiPart class.
The UI component uses JavaFx UI framework. The layout of these UI parts are defined in matching .fxml files that are in the src/main/resources/view folder. For example, the layout of the MainWindow is specified in MainWindow.fxml
The UI component,
-
Executes user commands using the
Logiccomponent. -
Binds itself to some data in the
Modelso that the UI can auto-update when data in theModelchange. -
Responds to events raised from various parts of the App and updates the UI accordingly.
3.3. Logic component

API :
Logic.java
-
Logicuses theAddressBookParserclass to parse the user command. -
This results in a
Commandobject which is executed by theLogicManager. -
The command execution can affect the
Model(e.g. adding a guest) and/or raise events. -
The result of the command execution is encapsulated as a
CommandResultobject which is passed back to theUi.
Given below is the Sequence Diagram for interactions within the Logic component for the execute("delete 1") API call.
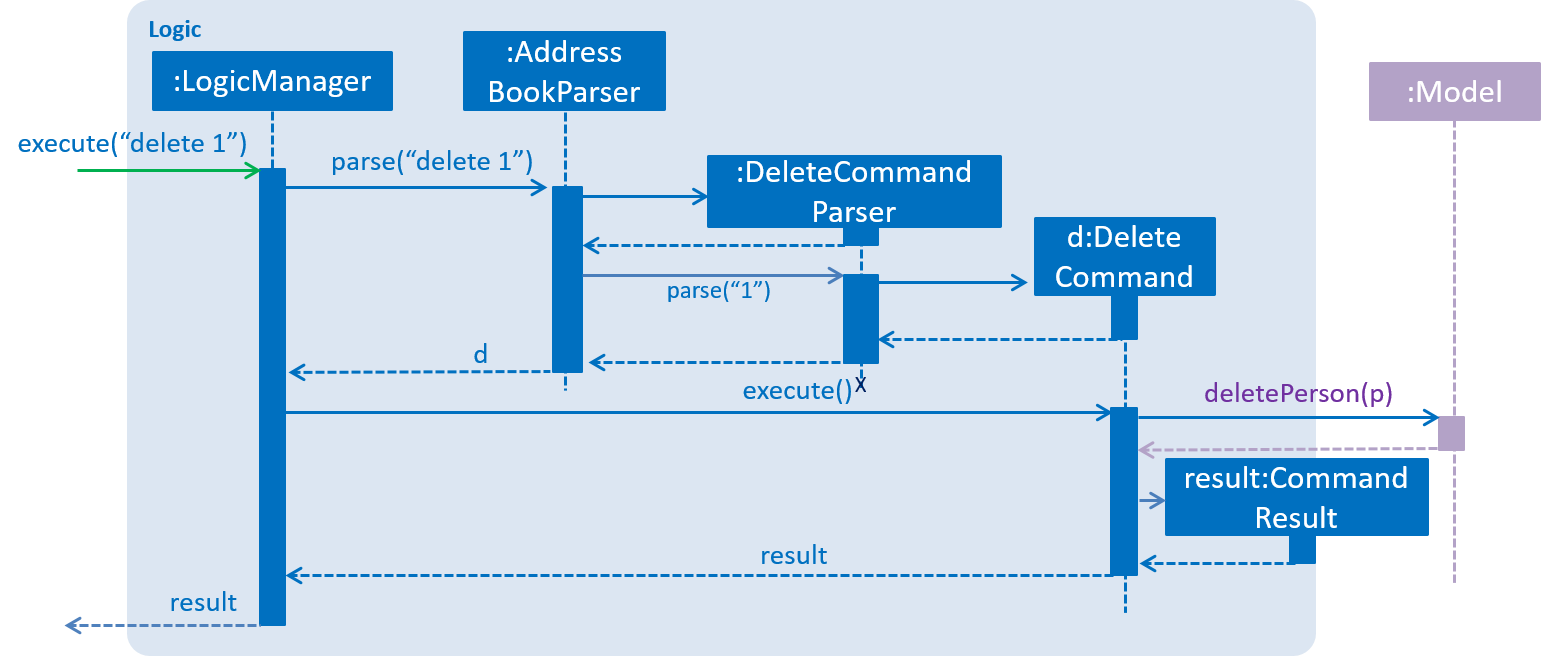
delete 1 Command3.4. Model component
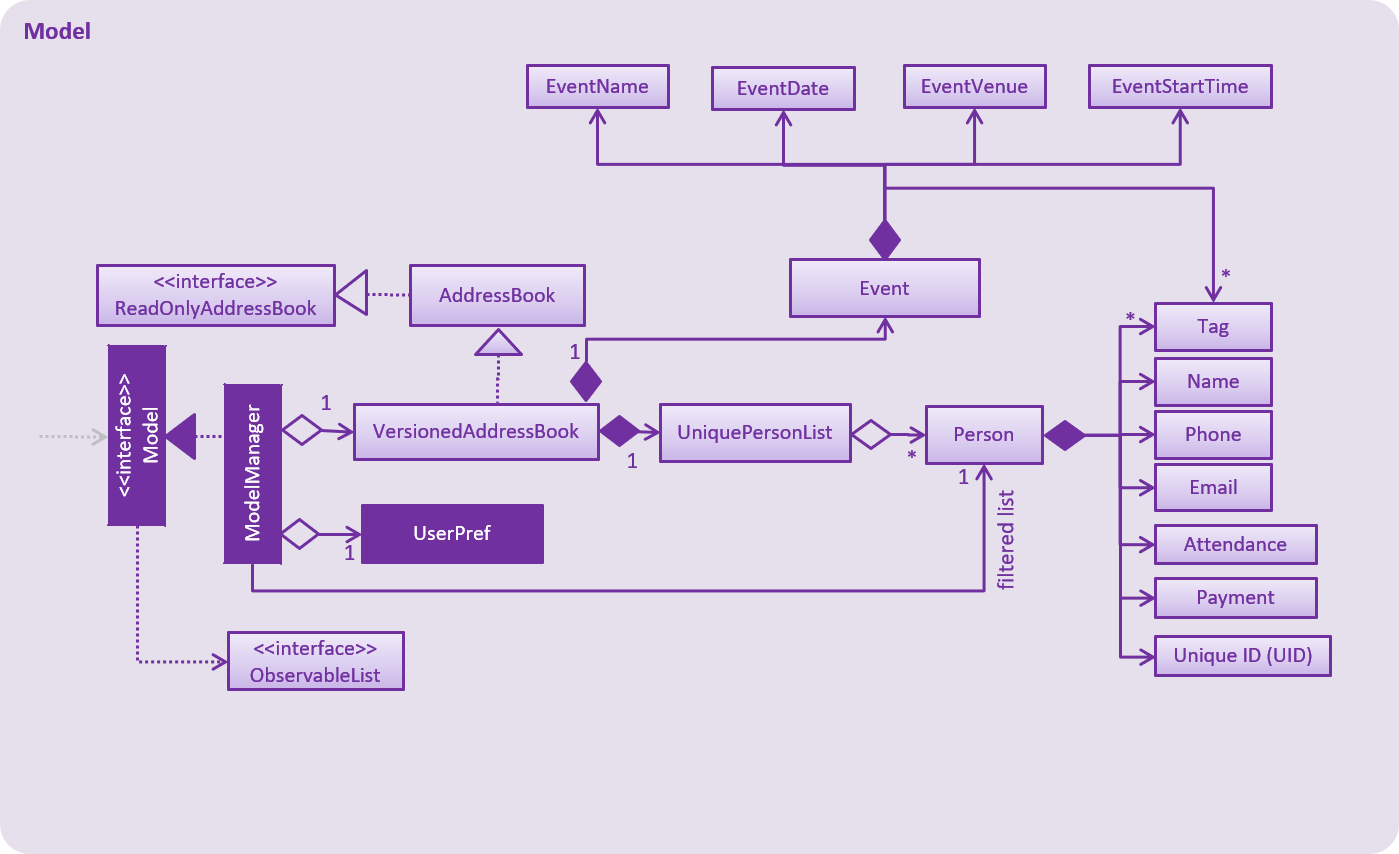
API : Model.java
The Model,
-
stores a
UserPrefobject that represents the user’s preferences. -
stores the Address Book data.
-
exposes an unmodifiable
ObservableList<Person>that can be 'observed' e.g. the UI can be bound to this list so that the UI automatically updates when the data in the list change. -
does not depend on any of the other three components.
As a more OOP model, we can store a Tag list in Address Book, which Person can reference. This would allow Address Book to only require one Tag object per unique Tag, instead of each Person needing their own Tag object. An example of how such a model may look like is given below..Structure of the Model Component following OOP 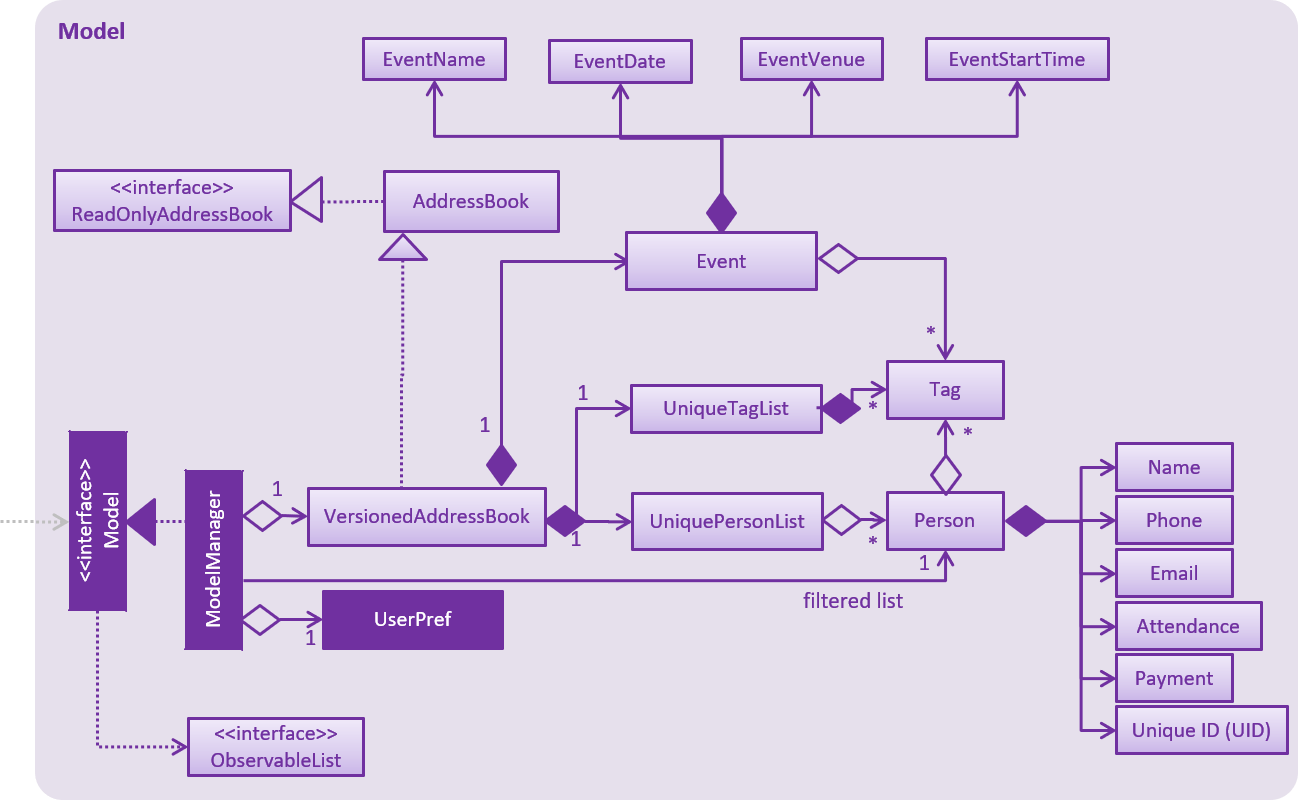
|
3.5. Storage component

API : Storage.java
The Storage component,
-
can save
UserPrefobjects in json format and read it back. -
can save the Address Book data in xml format and read it back.
3.6. Common classes
Classes used by multiple components are in the seedu.addressbook.commons package.
4. Implementation
This section describes some noteworthy details on how certain features are implemented.
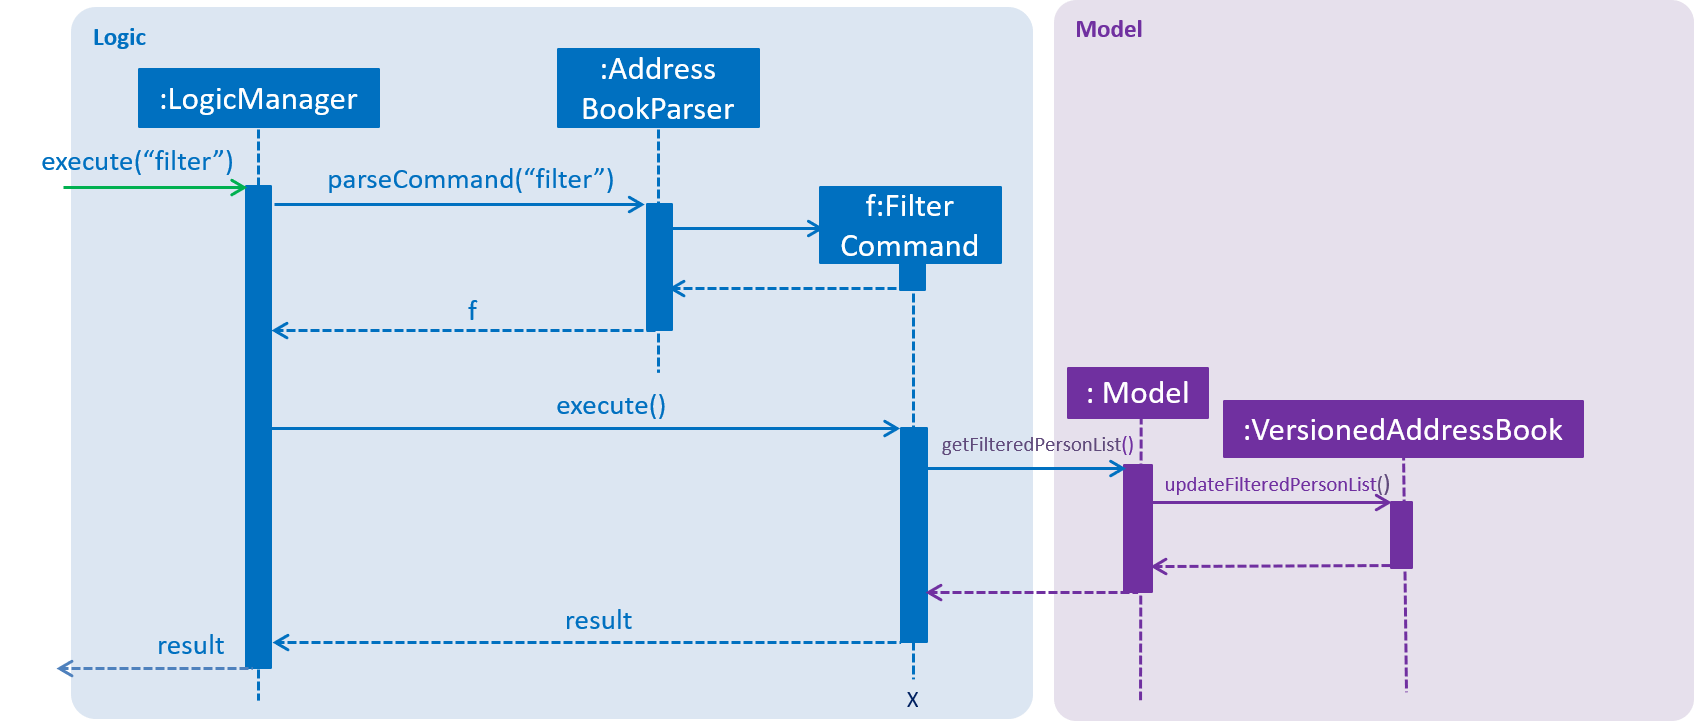
4.1. Filter feature
4.1.1. Current Implementation
The filter mechanism is facilitated by VersionedAddressBook.
Given below is an example usage scenario and how the filter mechanism behaves at each step.
Step 1. The user launches the application for the first time. The VersionedAddressBook
will be initialized with the initial address book state.
Step 2. The user executes filter t/vegan pa/paid command to obtain a list of people
who are Vegan and have paid.
The filter command calls Model#getFilteredPersonList().
The following sequence diagram shows how the filter operation works:
4.1.2. Design Considerations
Aspect: How filter executes
-
Alternative 1 (current choice): User has to include prefixes when using filter command.
-
Pros: Will use less memory (e.g. for
t/, just search through the tags field directly). -
Cons: We must ensure that the user includes the prefix of each individual keywords and check that the prefixes are correct.
-
-
Alternative 2: User just enters keywords without prefixes.
-
Pros: Easy to implement.
-
Cons: May have performance issues (e.g. to find guests with a particular tag, the application will have to go through the payment and attendance fields, before going through the tag field).
-
4.2. Find feature
4.2.1. Current Implementation
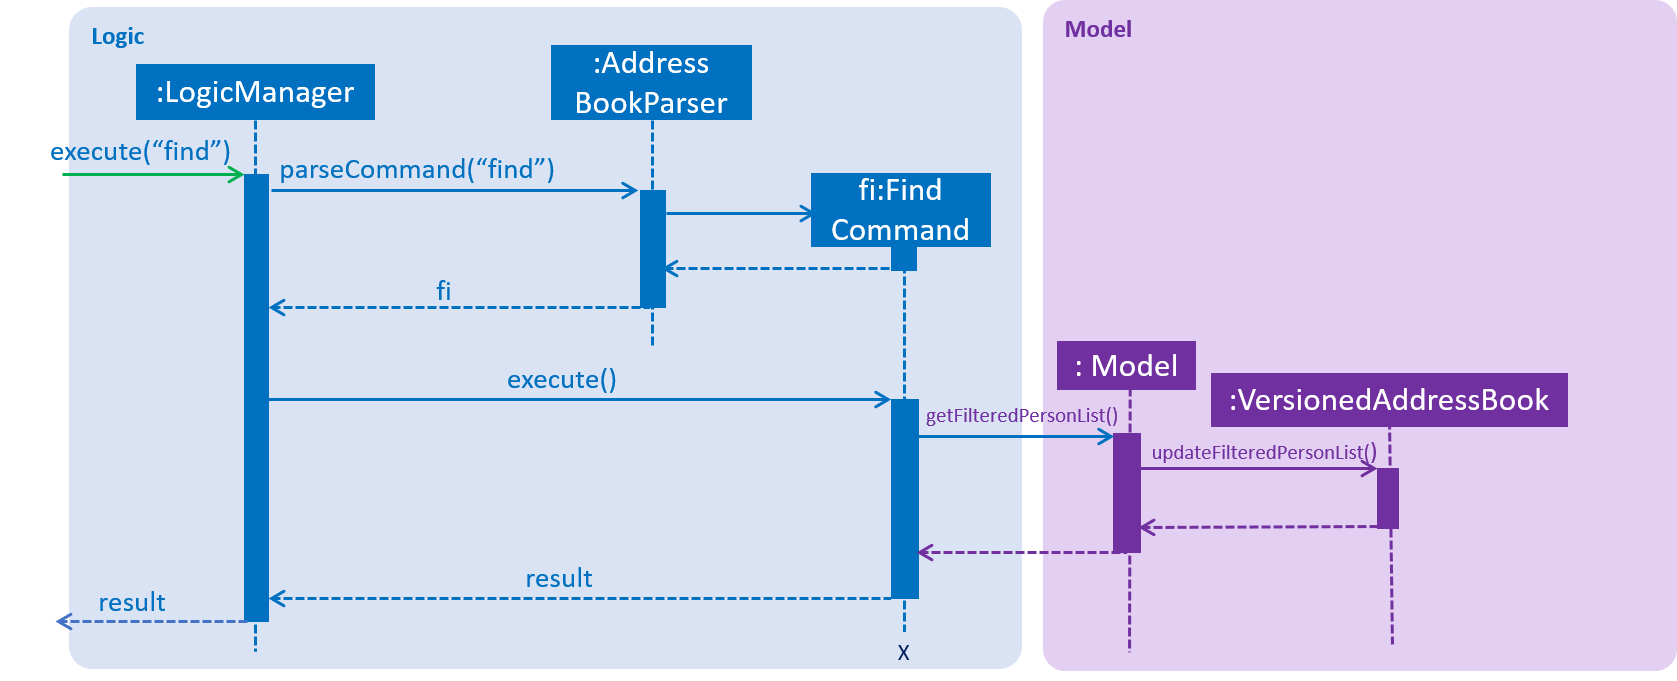
The find mechanism is facilitated by VersionedAddressBook.
Given below is an example usage scenario and how the find mechanism behaves at each step.
Step 1. The user launches the application for the first time. The VersionedAddressBook
will be initialized with the initial address book state.
Step 2. The user executes find n/Alex p/92743824 e/johndoe@gmail.com command to obtain
a list of people who have the name Alex, phone number 92743824 or email address
johndoe@gmail.com.
The find command calls Model#getFilteredPersonList().
The following sequence diagram shows how the find operation works:
4.2.2. Design Considerations
Aspect: How find executes
-
Alternative 1 (current choice): User has to include prefixes when using find command.
-
Pros: Will use less memory (e.g. for
e/, just search through the email field directly). -
Cons: We must ensure that the user includes the prefix of each individual keywords and check that the prefixes are correct.
-
-
Alternative 2: User just enters keywords without prefixes.
-
Pros: Easy to implement.
-
Cons: May have performance issues (e.g. to find a guest with a particular email address, the application will have to go through the name and phone number fields, before going through the email field).
-
4.3. Add/Delete Event feature
4.3.1. Current Implementation
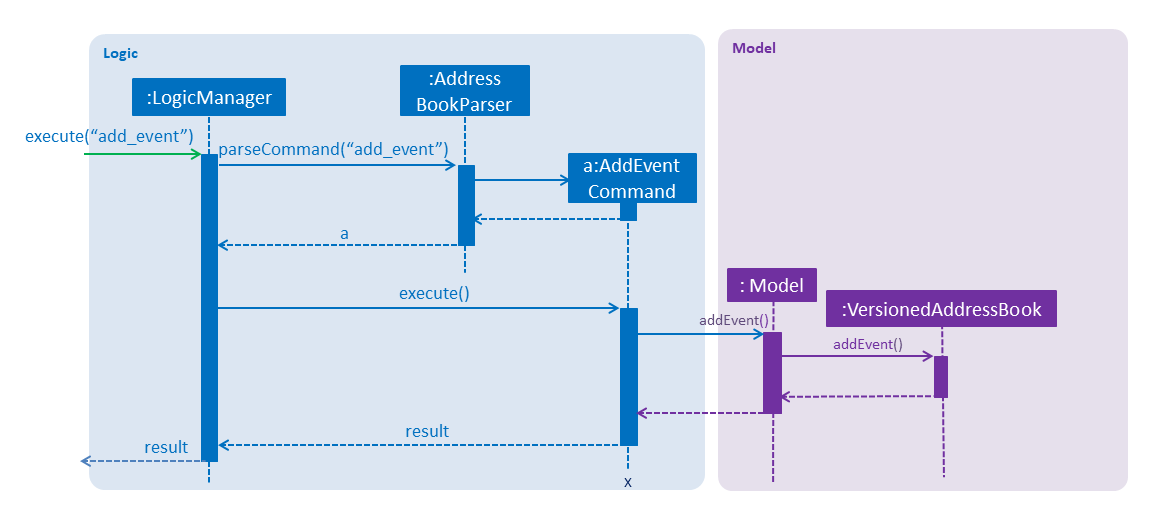
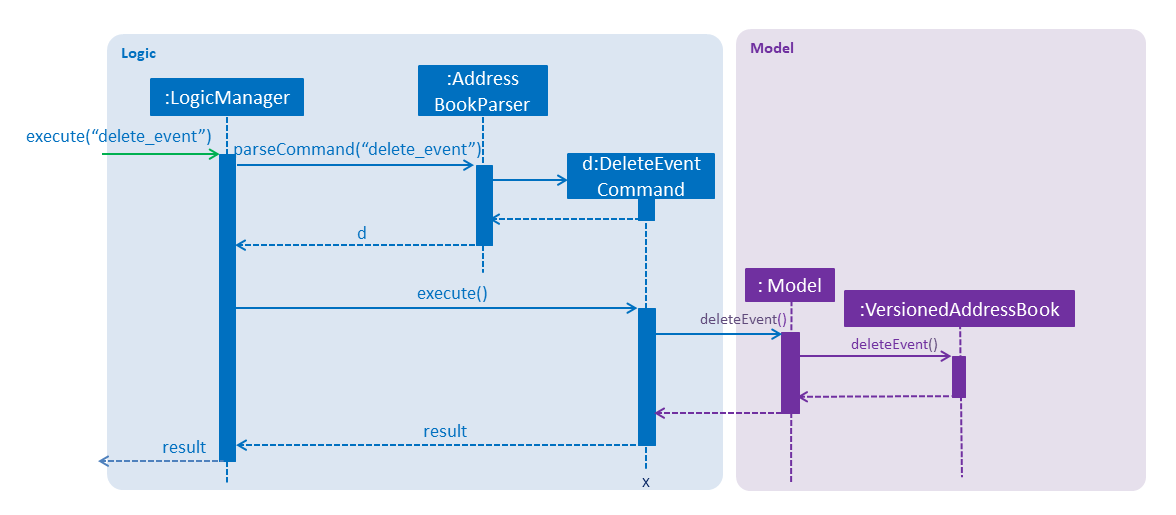
The add_event and delete_event mechanisms are facilitated by VersionedAddressBook.
Given below is an example usage scenario and how the add_event and delete_event mechanisms behave at each step.
Step 1. The user launches the application for the first time. The VersionedAddressBook will be initialized with the initial address book state, and the currentStatePointer pointing to that single address book state.
Step 2. The user executes add_event n/Wedding d/18/10/2019 v/Mandarin Hotel st/10:00 AM t/ClassicTheme command to add in details about the event they are currently organising.
The add_event command calls Model#addEvent() to add in the event details.
It calls 'Model#commitAddressBook()' which saves the modified state of the address book after the command executes in the addressBookStateList.
The currentStatePointer is shifted to the newly inserted address book state.
If a command fails its execution, it will not call Model#commitAddressBook(), so the address book state will not be saved into the addressBookStateList.
|
If the user has added in the details of the event they are organising, then another set of event details should not be stored.
The add_event command uses Model#hasEvent() to check if this is the case. If so, it will return an error to the user.
|
Step 3. After the event has taken place, the user decides to organise another event with the same guest list and deletes the event details using the 'delete_event' command.
The delete_event command calls Model#deleteEvent to delete the event’s details.
The command also calls Model#commitAddressBook(), causing another modified address book state to be saved into the `addressBookStateList.
If a command fails its execution, it will not call Model#commitAddressBook(), so the address book state will not be saved into the addressBookStateList.
|
If the user has not added in the details of an event, then there are no specific event details to delete.
The delete_event command uses Model#hasEvent() to check if this is the case. If so, it will return an error to the user.
|
The following sequence diagram shows how the add_event operation works:
The following sequence diagram shows how the delete_event operation works:
4.3.2. Design considerations
Aspect: Creation of the Event component
-
Alternative 1(current choice): Create an 'Event' with date, name, start time, venue and tag attributes and an aggregation association with 'AddressBook' wherein 'AddressBook' contains an 'Event' object.
-
Pros: It is easier to use and test.
-
Cons: The user can only organise 1 event at a time.
-
-
Alternative 2: Create an 'Event' having an aggregation association with 'VersionableAddressBook'. Create an 'InvitesBook' having an aggregation association with 'Event'.
-
Pros: It allows the user to organise multiple events and manage multiple event-specific guest lists.
-
Cons: The 'undo' and 'redo' commands are affected.
-
4.4. Edit Event feature
4.4.1. Current Implementation
The edit_event mechanism is facilitated by VersionedAddressBook.
Given below is an example usage scenario and how the edit_event mechanism behaves at each step.
Step 1. The user launches the application for the first time. The VersionedAddressBook will be initialized with the initial address book state, and the currentStatePointer pointing to that single address book state.
Step 2. The user executes add_event n/Wedding d/8/12/2019 v/Hilton st/10:00 AM command to add in details about the event they are currently organising.
Step 3. Due to a sudden change of plans, the user wishes to change the event’s date and venue.
The user executes 'edit_event d/10/12/2019 v/Novotel' command. The 'edit_event' command calls Model#updateEvent' to update the event’s details.
The command also calls Model#commitAddressBook() which saves the modified address book state into the addressBookStateList.
If a command fails its execution, it will not call Model#commitAddressBook(), so the address book state will not be saved into the addressBookStateList.
|
If the user has not added in the details of an event, then there are no specific event details to edit.
The edit_event command uses Model#hasEvent() to check if this is the case. If so, it will return an error to the user.
|
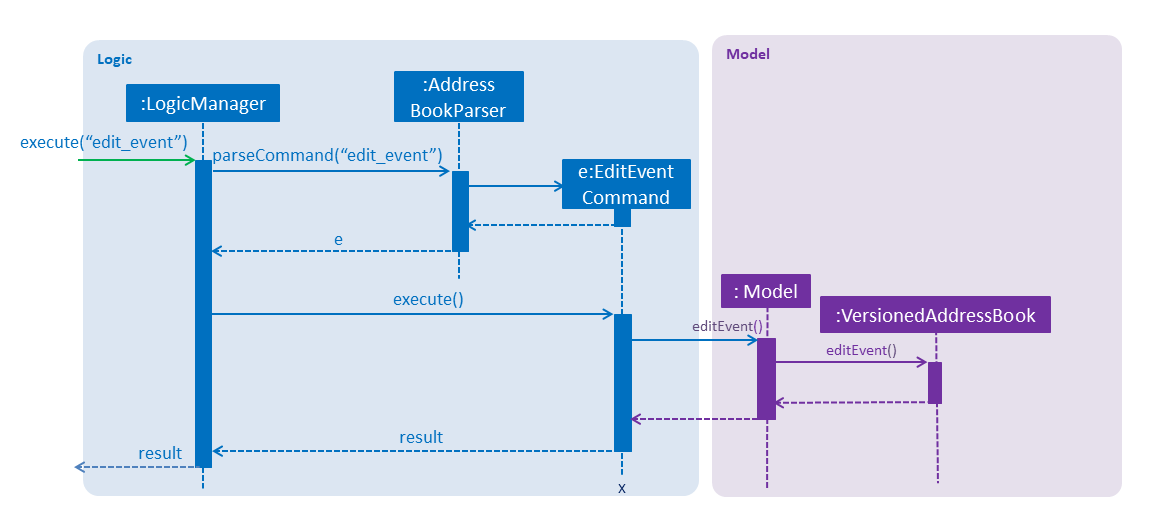
The following sequence diagram shows how the edit_event operation works:
4.5. Email Functionality
4.5.1. High Level Algorithm Design
The email functionality, comprising of the commands email, emailAll, and emailSpecific, allows the user to send individual and mass emails to their guests.
Moreover, all three commands will open a popup window to prompt the user to enter their relevant details, namely their email address and password,
as well as the email subject and message. Currently Gmail is the only supported domain for the user’s email address, however the implementation of this function
easily allows for more domains to be supported.
Additionally, the main location of the email functionality’s implementation resides within the Logic component, with an additional UI component to allow the user to input their details.
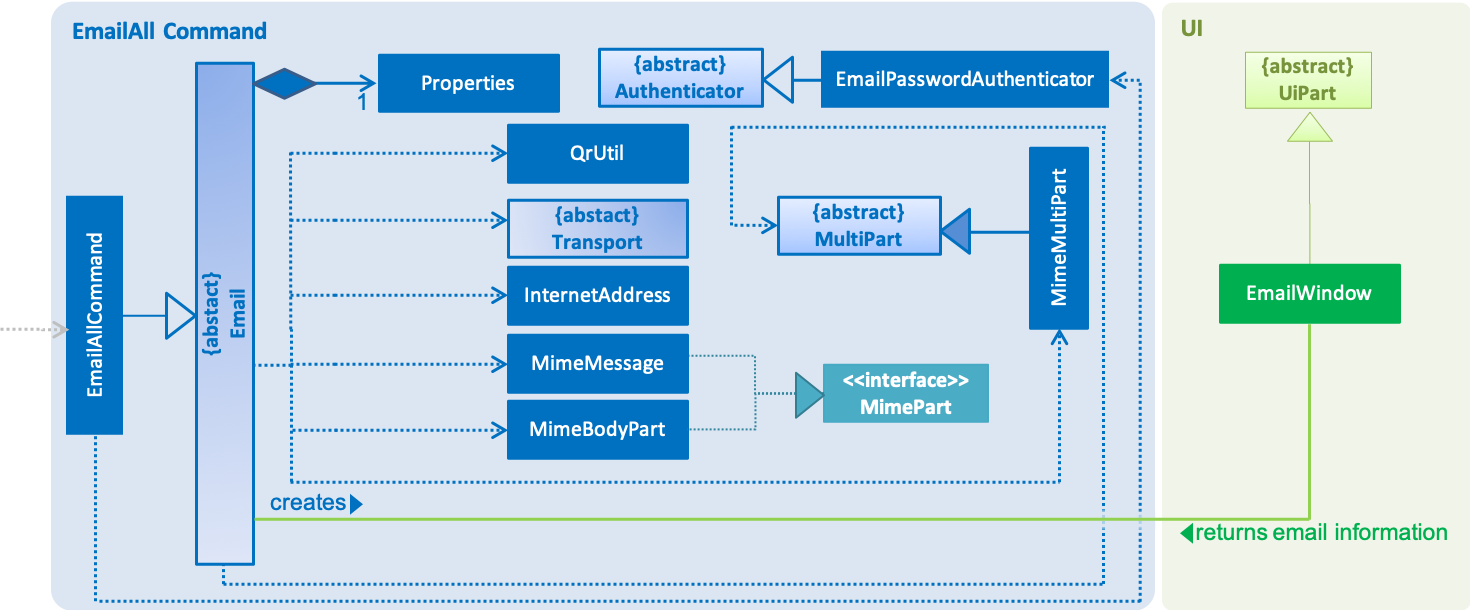
The figure above captures the main interactions between all classes when the user executes an emailAll command.
-
The command depends on the class
EmailPasswordAuthenticatorfor verification of the user’s email credentials and the abstract classEmail. TheEmailclass creates the email object to be sent, as well as establishes a connection with Gmail’s SMTP server viaProperties. -
Moreover, the creation of the UI window is facilitated by the class
EmailWindow, which also returns the email data once you input your details. -
Furthermore, the email object is created thanks to the
MimeMultiPartclass, and comprises of two main parts:-
The first part is the text input the user provided in the UI window, which is used by
MimeMessageandMimeBodyPart, both of which implement the interfaceMimePart. -
The second part is the QR code which acts as the guest’s ticket and is generated by
QrUtil. Note that currently only theemailcommand generates the QR code.
-
-
Finally, the email, with all its contents, is sent via the abstract class
Transport.
4.5.2. Command Mechanism
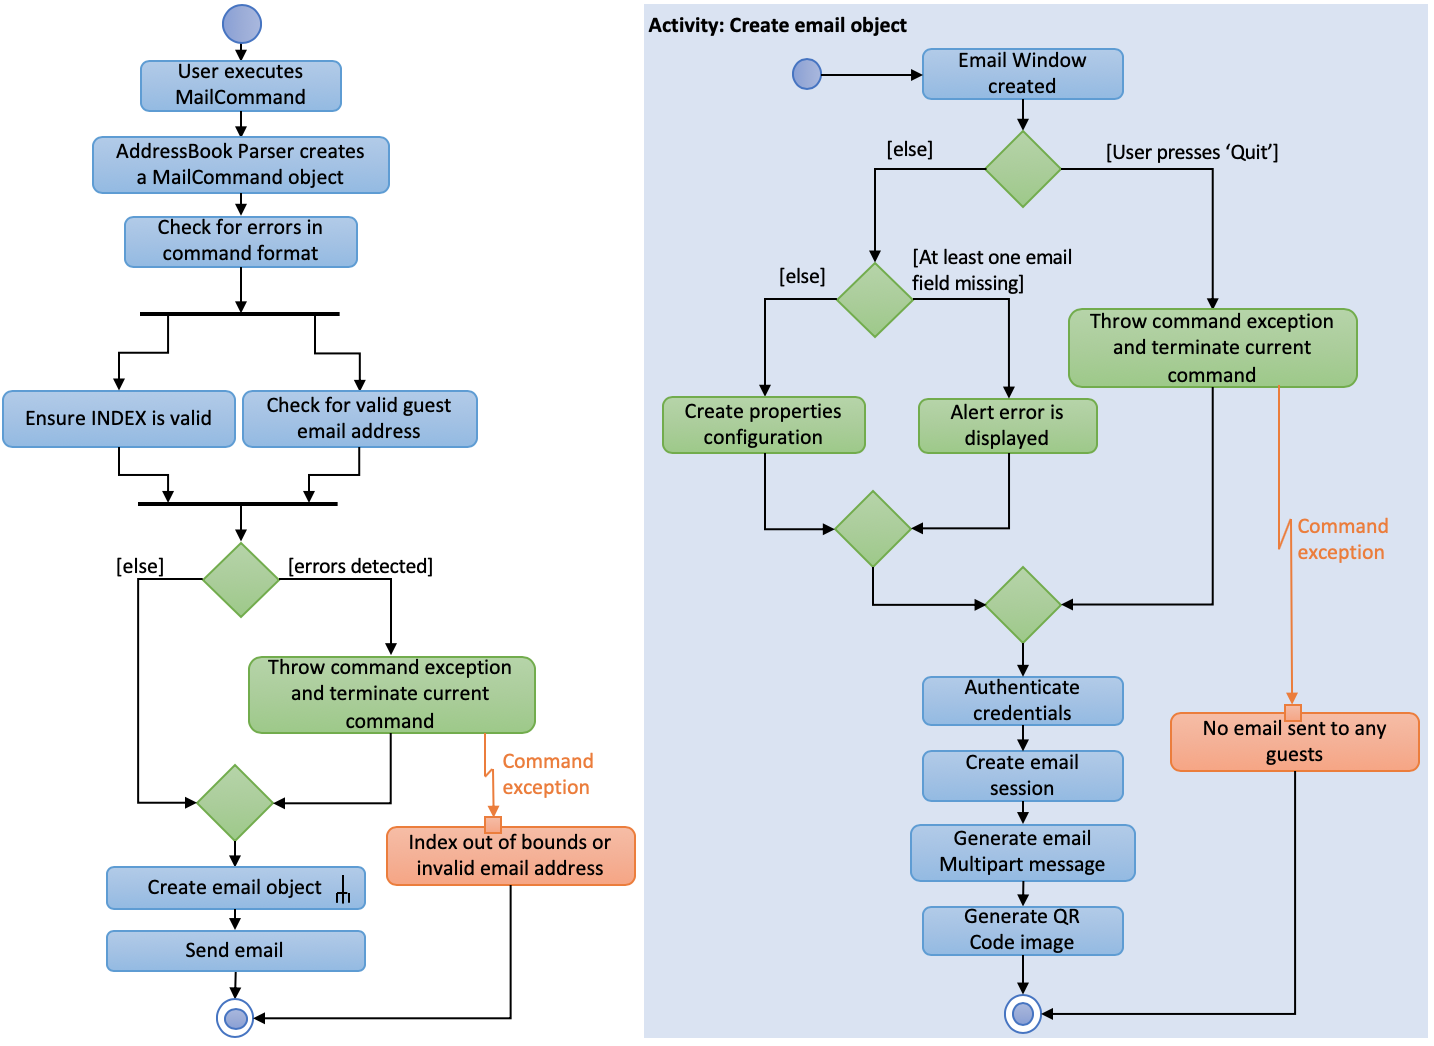
The figure above represents an activity diagram when the user executes the email command. As you can see, the command involves error checking, followed by creating an email object, and finally sending this email to an individual guest. Furthermore, this procedure follows the interactions described earlier.
4.5.3. Design Considerations
Aspect: Creating an EmailWindow for user input
-
Current choice: Creating the UI component directly from the abstract class Email.
-
Pros: Reduces dependencies with other UI components and increases cohesion with Email class.
-
Cons: Does not use a controller to create the UI component, it is called directly from logic component Email.
-
-
Alternative: Create a controller for showing
EmailWindow.-
Pros: Will fit with the software architecture of the codebase.
-
Cons: Current model will have to be changed to allow feed back of user input.
-
Aspect: Implementing email verification of guest email addresses
-
Current choice: Email addresses are only checked for validity, not whether they exist.
-
Pros: Efficient way to send mass emails without slowing down the program for verification.
-
Cons: User will be unaware if the guest email address does not exist, which may affect communication.
-
-
Alternative: Implement email validation for all possible email domains.
-
Pros: User is able to check which guest email addresses do not exist.
-
Cons: Would make the codebase bulkier and require multiple email domain configurations.
-
4.6. Import/Export Command
4.6.1. Current Implementation
High level overview of the class hierarchy
The import and export command enables batch importation and exportation of people into and out of the guest list. Additionally, the import command will create a popup window to show the errors during import only if there are any. The commands currently only support comma-separated value file format (CSV), however, it is designed to easily support other formats such as VCard in the future.
The implementation of the import and export feature mainly resides under the logic component of the application. The import command involves an additional user interface (UI) component that shows import errors.
The Import/Export feature is facilitated by the AdaptedPerson,PersonConverter and SupportedFile interfaces. They provide the behaviour specifications so that the Import/Export command will be able to operate without knowing the underlying implementations.
-
AdaptedPersonrepresents a person in the respective file format. It requires the following method.-
AdaptedPerson#getFormattedString(): returns the string representation of the person according to the particular file format.
-
-
SupportedFilerepresents a supported file that is able to read and writeAdaptedPersons' to the actual file on the computer. Here are some of its key methods-
SupportedFile#readAdaptedPersons(): Returns all person in the form ofAdaptedPersons from the file -
SupportedFile#writeAdaptedPersons(): Writes allAdaptedPersonto the file
-
-
PersonConverterrepresents a person converter that is able to convert betweenPersons andAdaptedPersons. Here are some of its key methods.-
PersonConverter#encodePerson(): Encodes aPersonobject and returns the correspondingAdaptedPersonobject -
PersonConverter#decodePerson(): Decodes anAdaptedPersonobject and returns correspondingPersonobject
-
To support the import/export of CSV files, CsvAdaptedPerson,CsvPersonConverter and CsvFile implements the above mentioned interfaces.
For the import command, the popup window to show errors encountered is facilitated by the ImportError and ImportReportWindow classes.
-
ImportErrorrepresents an error encountered during the import command. It stores the actual CSV formatted person and its associated error message. -
ImportReportErroris the controller class of the popup window that will display allImportErrors encountered during the execution of an import command.
The following class diagrams shows the relationship between the classes and interfaces mentioned above.
Command mechanism
The import command will first read the csv file and loop through all the guest data and add them into the model. When application encounters a particular guest in CSV file which fails to be converted or is already an existing guest, an ImportError will be created. These ImportError object will be added in a list within the import command.
After the command completes the importation of all guests in the guest list, if there are unsuccessful imports, it will trigger a ShowImportReportEvent which will display the errors
The following sequence diagram shows how the Import operation works:
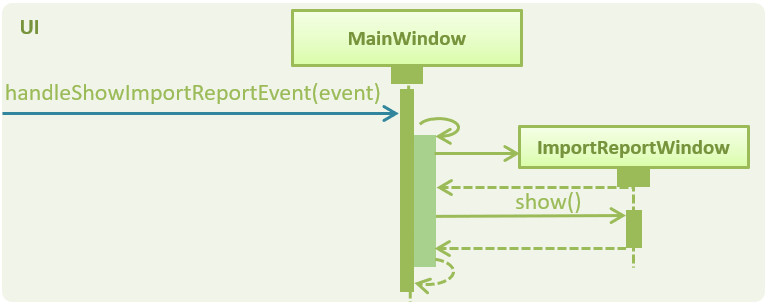
The ShowImportReportEvent will be handled by the MainWindow according to the following sequence diagram below.
The export command will only export the currently filtered guest list by calling Model#getFilteredPersonList. This enables greater flexibility as it provides a way for users to select specific groups of people to export. The following sequence diagram shows how the export operation works:
4.6.2. Design Considerations
Aspect: Implementing decoding/encoding functionality in Import/Export command
-
Alternative 1 (current choice): import & export command be able to do accept a general
PersonConverter-
Pros: Reduction in code duplication when supporting other file-formats in the future. Easier to mock and do unit tests.
-
Cons: More complicated to implement.
-
-
Alternative 2: Each supported format has its own command which knows how to do the required conversion
-
Pros: We do not need to check for the required import/export format required.
-
Cons: Higher testing overhead for possible numerous types of export & import command. Duplicated boilerplate code.
-
Aspect: Implementing the reading/writing of file functionality in Import/Export command
-
Alternative 1: Abstract the writing/reading of files into separate classes,
SupportedFileinterface andCsvFileclass (current choice)-
Pros: Able to add support for other file formats with changing existing code.
-
Cons: Increased code complexity.
-
-
Alternative 2: Use a utility class with static methods
-
Pros: Simple to implement.
-
Cons: Violates open-close principle. Code will only work for CSV files. High coupling with the import/export command. Impossible to mock, decreases the testability of the import/export commands.
-
4.7. Mark/Unmark Command
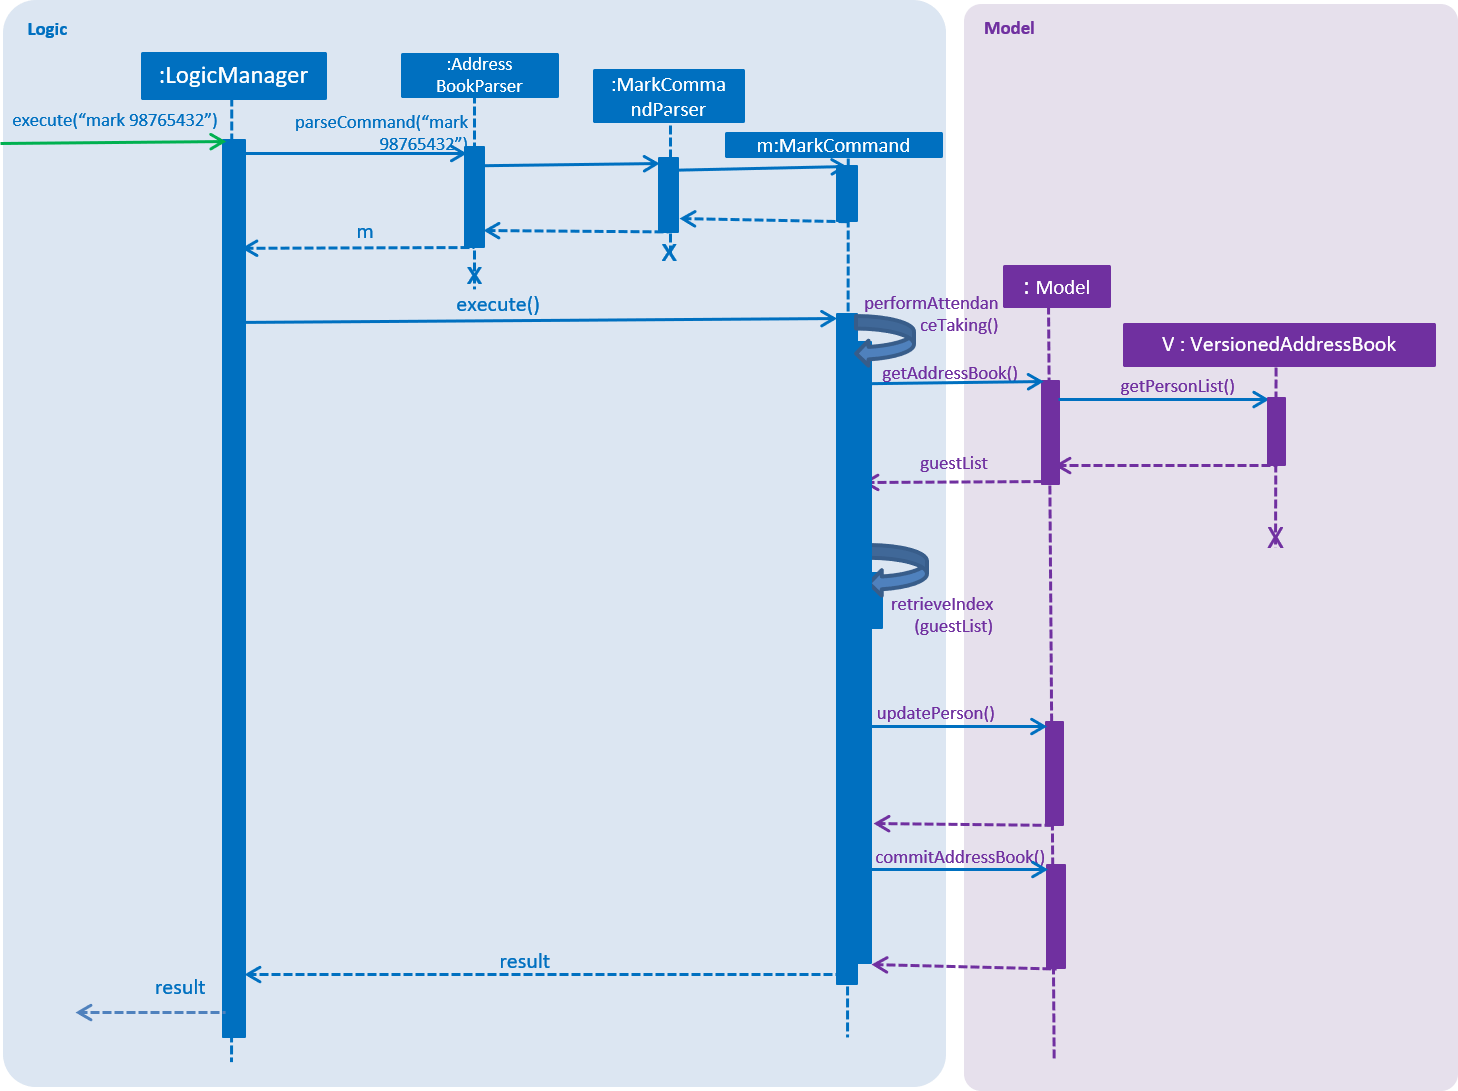
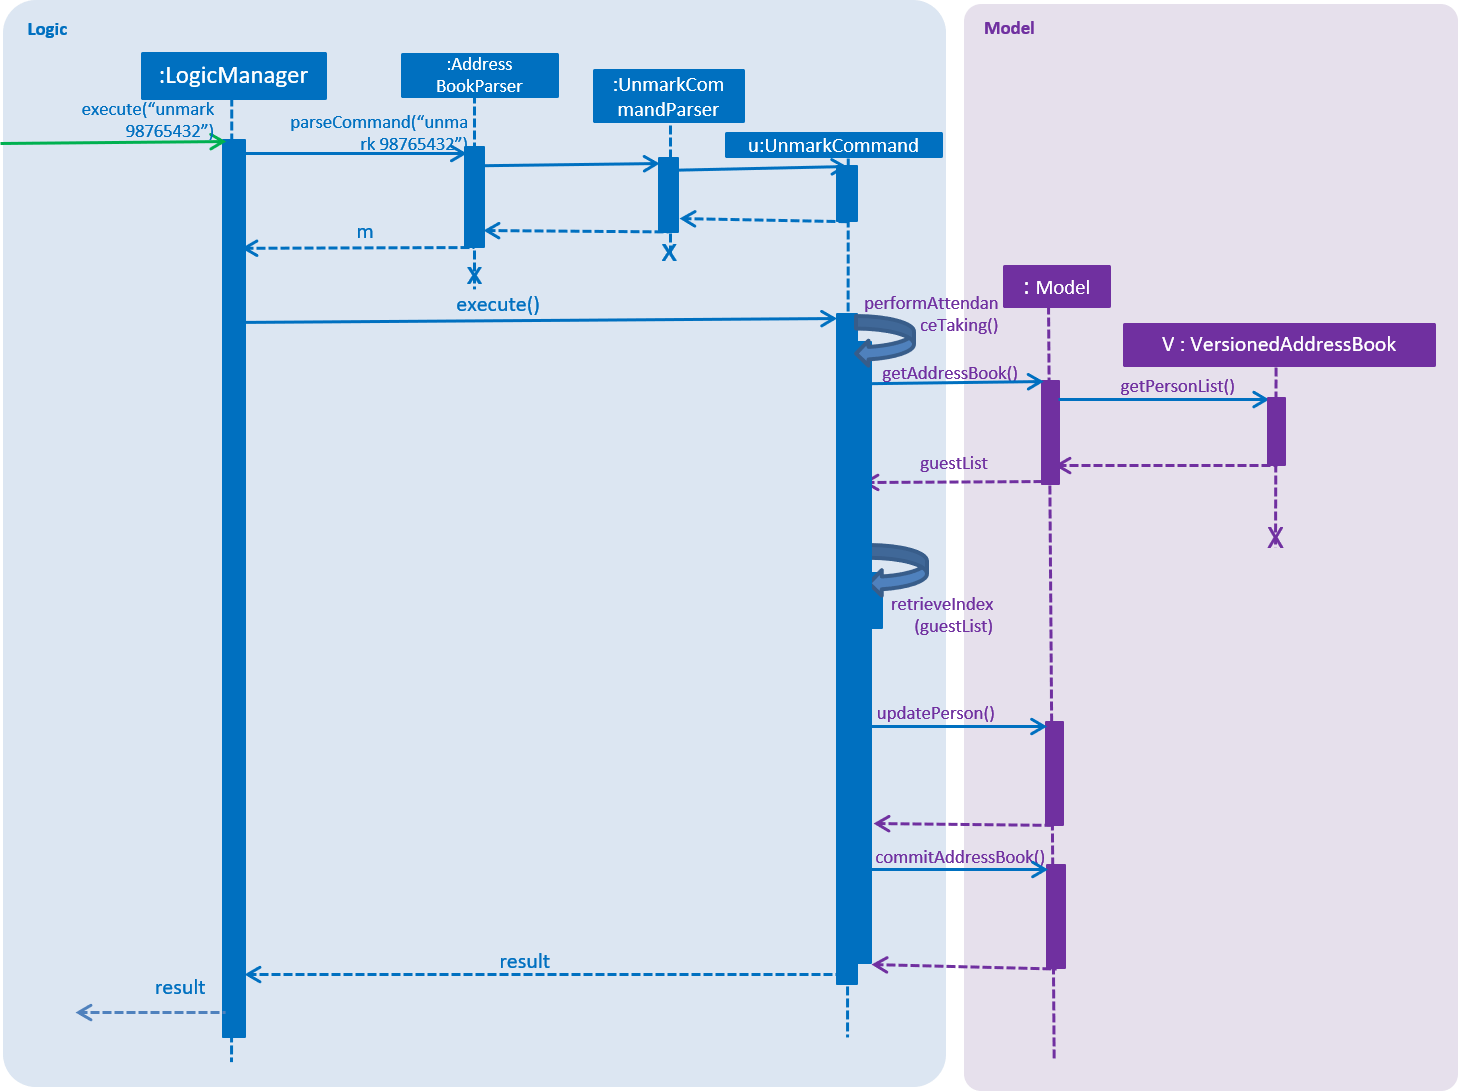
The mark/unmark mechanism is facilitated by Model.
Given below is an example usage scenario and how the mark/unmark command executes at each step:
Step 1. The user launches the application for the first time. The VersionedAddressBook will be initialized with the initial address book state and the currentStatePointer pointing to that single address book state.
Step 2. The user executes the command import guestlist.csv to import a list of guest and add them to the current state of the AddressBook.
Alternatively, the user can execute the command add_guest n/John Doe p/98765432 e/johnd@gmail.com pa/PAID a/ABSENT u/00001 t/NORMAL to create an instance of one guest and add them to the current state of AddressBook.
|
Step 3. The user will execute the command mark 00001 to set the attendance of the Person to PRESENT.
Step 4. An instance of getPersonList is retrieved from the model using MODEL#getAddressBook#getPersonList. A linear search is then executed on the getPersonList to find a Person with the same Unique ID (UID) as 00001.
If there is no matching UID found, a COMMANDEXCEPTION will be thrown to indicate nobody in the list has the phone number.
If there is more than one instance of the same UID, a COMMANDEXCEPTION will be thrown to indicate that there are more than one instance of the same UID. In this case, edit_guest will not work. The user has to delete the entry and add_guest for the deleted entry.
|
Step 5. After retrieving the information from the discovered Person, another Person is created with the same fields with the exception of the attendance field being changed from ABSENT to PRESENT.
Step 6. Finally, the entry is updated using MODEL#updatePerson to transfer the new information into the Model before commitAddressBook is executed to save the state of the AddressBook.
The following sequence diagram shows how the mark operation works:
The following sequence diagram shows how the ummark operation works:
4.7.1. Design Considerations
Aspect: How mark/unmark executes
-
Alternative 1 (current choice): access the
PersonListmodel to execute marking of attendance.-
Pros: Able to mark the attendance of anybody within the list even when it is filtered. Prevents the bug of a person filtering the list to only show a single instance of the multiple similar UID to mark their attendance.
-
Cons: Some changes might be hard to detect when displaying a filtered list.
-
-
Alternative 2: access the
filteredPersonListmodel to execute the marking of attendance.-
Pros: Able to work with a smaller set of people in the list. Changes made are immediately observable.
-
Cons: Introduces bugs such as avoiding the similar UID check within the current instance of the guest list. If the filtered list does not immediately have the UID that needs to be used, the user has to call
listcommand first. Increasing the chance of human error in the system.
-
4.8. Extension made to add_guest: Generate Unique ID (UID) on creation of an entry into the list
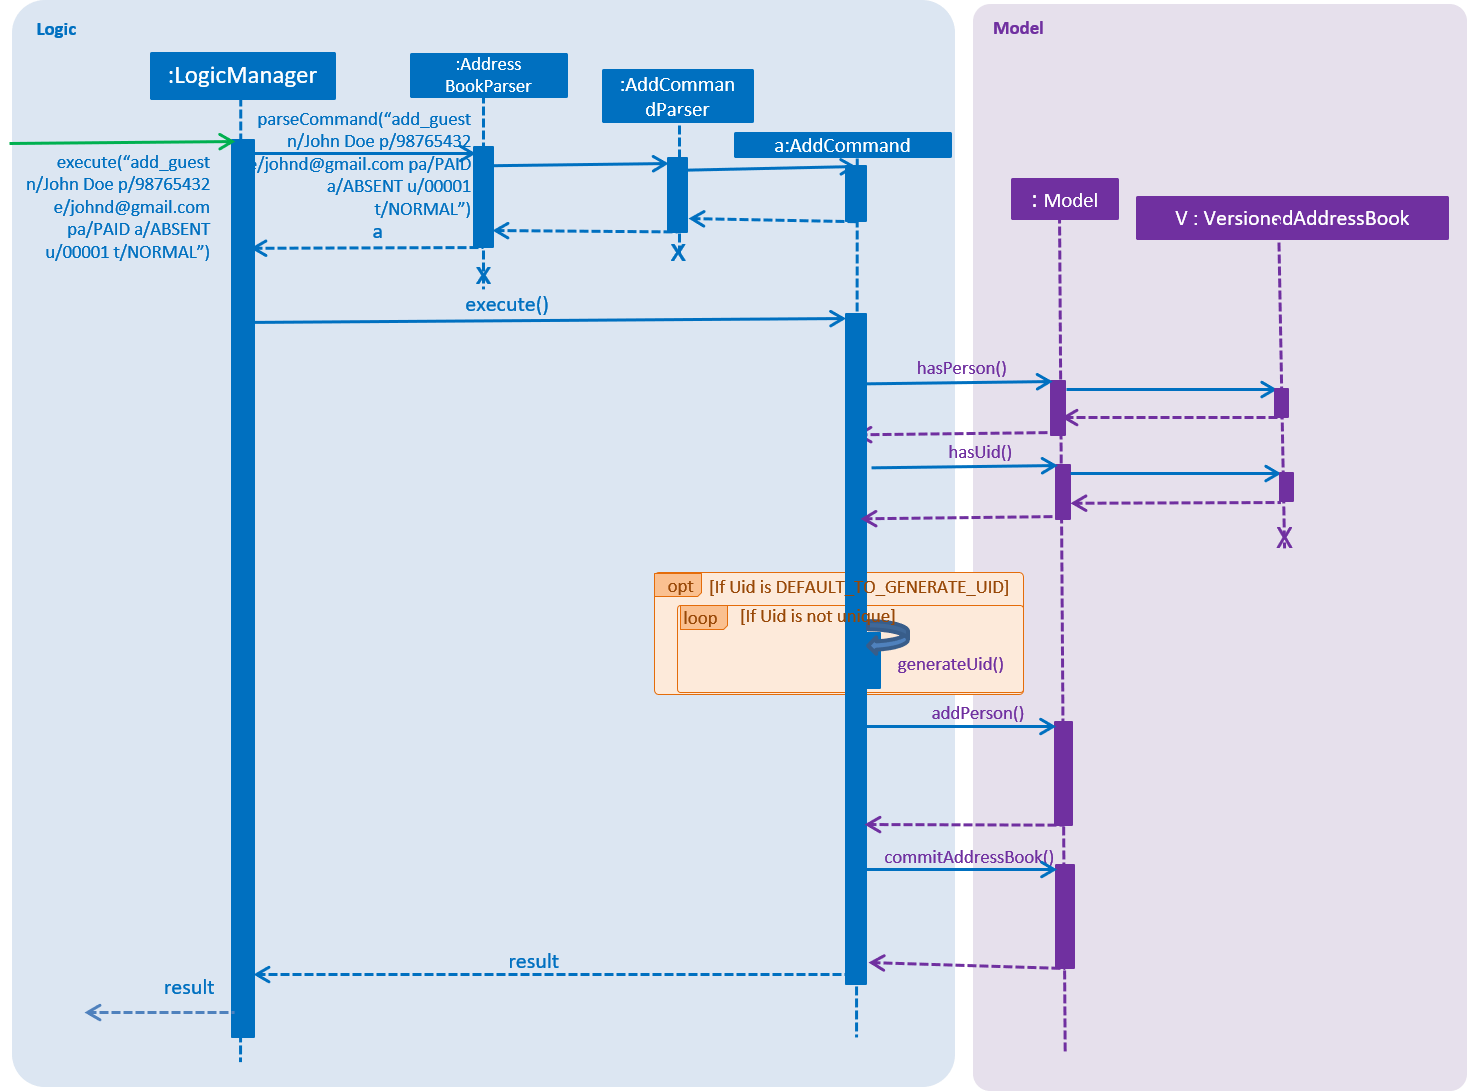
This feature is facilitated by the usage of the Model.
Given below is an example of the execution of the added functionality of the add_guest command.
Step 1. The user launches the application for the first time. The VersionedAddressBook will be initialized with the initial address book state and the currentStatePointer pointing to that single address book state.
Step 2. The user executes the add_guest command with the following non-null fields: add_guest n/John Doe p/98765432 e/johnd@gmail.com pa/PAID a/ABSENT u/00000 t/NORMAL.
Step 3. The addCommandParser extracts the relevant information from the command and returns a Person model that was built with the given arguments.
Step 4. The add_guest.execute function receives the generated Person model and checks for duplicates of the same Person as well as duplicates of the same UID in the VersionedAddressBook.
If the checks fail, COMMANDEXCEPTION will be thrown to indicate the existence of more than one of the same UID or Person
|
Step 5. The function will test the equality between the UID given in the generated Person and the DEFAULT_TO_GENERATE_UID which is u/00000. From here the program will do one of 2 different things.
Step 6a. If the UID given is not the same as DEFAULT_TO_GENERATE_UID:
The program will treat this as a user defined UID and add the Person into the Model without generating a new UID.
Step 6b. Alternatively, If the UID input in step 2 is the same as DEFAULT_TO_GENERATE_UID:
The program will create a new Person model with the same arguments with the exception of UID. The UID is then generated randomly in the generateUid() function.
Another check is done to ensure that the UID does not already exist in the VersionedAddressBook.
This is done in a loop to ensure the UID is unique before adding the Person into the Model by executing addPerson().
Step 7. After adding the Person into the Model, the program commits the changes by executing commitAddressBook to save the state of the AddressBook..
The following sequence diagram shows how the add_guest command works:
4.8.1. Design Considerations
Aspect: Whether to only generate UID or to allow the user to define UID
-
Alternative 1 (current choice): give the user the freedom to choose between defining their own
UIDor letting the program generate one itself.-
Pros: Able to write tests for the command that will not fail. A company or event may already be using some sort of unique identification, this can be used by the event planner to uniquely identify attendees. If there is none, the user can just let the program generate one for them.
-
Cons: Increased code complexity
-
-
Alternative 2: only let the user define the
UIDfor all attendees of the event.-
Pros: Decreased code complexity
-
Cons: User will face great difficulty in creating UID for a large group of people if there is no unique identifier available for the attendees already.
-
-
Alternative 3: only generate the
UIDfor all the attendees in the list, user input for the UID is not allowed.-
Pros: Decreased code complexity
-
Cons: Unable to write meaningful tests if the the actual output is going to be random. Users may already have a way to uniquely identify the attendees to the event but the event planner cannot make use of that method.
-
4.9. [Proposed] Data Encryption
{We plan on implementing a data encryption feature such that when the user chooses to, the data stored in the addressbook will be encrypted and display ceases to show all information.}
4.10. [Proposed] Guest Email Verification
{We plan on implementing a guest email verification system, that lets the user know which of their guest email addresses exist, for any email domain.}
4.11. Logging
We are using java.util.logging package for logging. The LogsCenter class is used to manage the logging levels and logging destinations.
-
The logging level can be controlled using the
logLevelsetting in the configuration file (See Section 4.12, “Configuration”) -
The
Loggerfor a class can be obtained usingLogsCenter.getLogger(Class)which will log messages according to the specified logging level -
Currently log messages are output through:
Consoleand to a.logfile.
Logging Levels
-
SEVERE: Critical problem detected which may possibly cause the termination of the application -
WARNING: Can continue, but with caution -
INFO: Information showing the noteworthy actions by the App -
FINE: Details that is not usually noteworthy but may be useful in debugging e.g. print the actual list instead of just its size
4.12. Configuration
Certain properties of the application can be controlled (e.g App name, logging level) through the configuration file (default: config.json).
5. Documentation
We use asciidoc for writing documentation.
| We chose asciidoc over Markdown because asciidoc, although a bit more complex than Markdown, provides more flexibility in formatting. |
5.1. Editing Documentation
See UsingGradle.adoc to learn how to render .adoc files locally to preview the end result of your edits.
Alternatively, you can download the AsciiDoc plugin for IntelliJ, which allows you to preview the changes you have made to your .adoc files in real-time.
5.2. Publishing Documentation
See UsingTravis.adoc to learn how to deploy GitHub Pages using Travis.
5.3. Converting Documentation to PDF format
We use Google Chrome for converting documentation to PDF format, as Chrome’s PDF engine preserves hyperlinks used in webpages.
Here are the steps to convert the project documentation files to PDF format.
-
Follow the instructions in UsingGradle.adoc to convert the AsciiDoc files in the
docs/directory to HTML format. -
Go to your generated HTML files in the
build/docsfolder, right click on them and selectOpen with→Google Chrome. -
Within Chrome, click on the
Printoption in Chrome’s menu. -
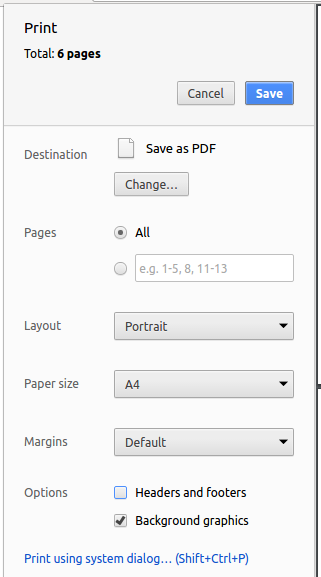
Set the destination to
Save as PDF, then clickSaveto save a copy of the file in PDF format. For best results, use the settings indicated in the screenshot below.
5.4. Site-wide Documentation Settings
The build.gradle file specifies some project-specific asciidoc attributes which affects how all documentation files within this project are rendered.
Attributes left unset in the build.gradle file will use their default value, if any.
|
| Attribute name | Description | Default value |
|---|---|---|
|
The name of the website. If set, the name will be displayed near the top of the page. |
not set |
|
URL to the site’s repository on GitHub. Setting this will add a "View on GitHub" link in the navigation bar. |
not set |
|
Define this attribute if the project is an official SE-EDU project. This will render the SE-EDU navigation bar at the top of the page, and add some SE-EDU-specific navigation items. |
not set |
5.5. Per-file Documentation Settings
Each .adoc file may also specify some file-specific asciidoc attributes which affects how the file is rendered.
Asciidoctor’s built-in attributes may be specified and used as well.
Attributes left unset in .adoc files will use their default value, if any.
|
| Attribute name | Description | Default value |
|---|---|---|
|
Site section that the document belongs to.
This will cause the associated item in the navigation bar to be highlighted.
One of: * Official SE-EDU projects only |
not set |
|
Set this attribute to remove the site navigation bar. |
not set |
5.6. Site Template
The files in docs/stylesheets are the CSS stylesheets of the site.
You can modify them to change some properties of the site’s design.
The files in docs/templates controls the rendering of .adoc files into HTML5.
These template files are written in a mixture of Ruby and Slim.
|
Modifying the template files in |
6. Testing
6.1. Running Tests
There are three ways to run tests.
| The most reliable way to run tests is the 3rd one. The first two methods might fail some GUI tests due to platform/resolution-specific idiosyncrasies. |
Method 1: Using IntelliJ JUnit test runner
-
To run all tests, right-click on the
src/test/javafolder and chooseRun 'All Tests' -
To run a subset of tests, you can right-click on a test package, test class, or a test and choose
Run 'ABC'
Method 2: Using Gradle
-
Open a console and run the command
gradlew clean allTests(Mac/Linux:./gradlew clean allTests)
| See UsingGradle.adoc for more info on how to run tests using Gradle. |
Method 3: Using Gradle (headless)
Thanks to the TestFX library we use, our GUI tests can be run in the headless mode. In the headless mode, GUI tests do not show up on the screen. That means the developer can do other things on the Computer while the tests are running.
To run tests in headless mode, open a console and run the command gradlew clean headless allTests (Mac/Linux: ./gradlew clean headless allTests)
6.2. Types of tests
We have two types of tests:
-
GUI Tests - These are tests involving the GUI. They include,
-
System Tests that test the entire App by simulating user actions on the GUI. These are in the
systemtestspackage. -
Unit tests that test the individual components. These are in
seedu.address.uipackage.
-
-
Non-GUI Tests - These are tests not involving the GUI. They include,
-
Unit tests targeting the lowest level methods/classes.
e.g.seedu.address.commons.StringUtilTest -
Integration tests that are checking the integration of multiple code units (those code units are assumed to be working).
e.g.seedu.address.storage.StorageManagerTest -
Hybrids of unit and integration tests. These test are checking multiple code units as well as how the are connected together.
e.g.seedu.address.logic.LogicManagerTest
-
6.3. Troubleshooting Testing
Problem: HelpWindowTest fails with a NullPointerException.
-
Reason: One of its dependencies,
HelpWindow.htmlinsrc/main/resources/docsis missing. -
Solution: Execute Gradle task
processResources.
7. Dev Ops
7.1. Build Automation
See UsingGradle.adoc to learn how to use Gradle for build automation.
7.2. Continuous Integration
We use Travis CI and AppVeyor to perform Continuous Integration on our projects. See UsingTravis.adoc and UsingAppVeyor.adoc for more details.
7.3. Coverage Reporting
We use Coveralls to track the code coverage of our projects. See UsingCoveralls.adoc for more details.
7.4. Documentation Previews
When a pull request has changes to asciidoc files, you can use Netlify to see a preview of how the HTML version of those asciidoc files will look like when the pull request is merged. See UsingNetlify.adoc for more details.
7.5. Making a Release
Here are the steps to create a new release.
-
Update the version number in
MainApp.java. -
Generate a JAR file using Gradle.
-
Tag the repo with the version number. e.g.
v0.1 -
Create a new release using GitHub and upload the JAR file you created.
7.6. Managing Dependencies
A project often depends on third-party libraries. For example, Address Book depends on the Jackson library for XML parsing. Managing these dependencies can be automated using Gradle. For example, Gradle can download the dependencies automatically, which is better than these alternatives.
a. Include those libraries in the repo (this bloats the repo size)
b. Require developers to download those libraries manually (this creates extra work for developers)
Appendix A: Product Scope
Target user profile:
-
has a need to manage a significant number of contacts
-
prefer desktop apps over other types
-
can type fast
-
prefers typing over mouse input
-
is reasonably comfortable using CLI apps
Value proposition: manage contacts faster than a typical mouse/GUI driven app
Appendix B: User Stories
Priorities: High (must have) - * * *, Medium (nice to have) - * *, Low (unlikely to have) - *
| Priority | As a … | I want to … | So that I can… |
|---|---|---|---|
|
event planner |
be able to mark attendance of guests easily |
minimise holdup as much as possible |
|
event planner |
be able to view event details and countdown to event date |
take note of important details closer to the event date. |
|
event planner |
be able to delete event details easily |
organise another event with the same guest list but different event details. |
|
event planner |
be able to send mass emails to guests |
remind them about the event |
|
event planner |
be able to tag guests with specific labels |
take note of any extra details if necessary |
|
event planner specialising in large events such as weddings |
tag all my guests in the list at once |
save a lot of time and increase efficiency, as opposed to editing the tags of each individual guest |
|
event planner specialising in large weddings |
be able to track the guest list for each event |
know how many guests there are in each event in order to know which event I should focus more on |
|
event planner specialising in concerts |
be able to filter my guests to see who have not paid for the event |
easily see who I need to remind |
|
event planner |
be able to view all the important details of guests |
get all the necessary details at one go for easier planning |
|
event planner specialising in concerts and arts festivals |
be able to send the guests their tickets via email |
ensure that all guests will have their tickets with them and there will be no complications |
|
event planner for a large event |
be able to add large numbers of guests to the guest list efficiently |
reduce time spent on adding them one at a time. |
|
event planner for an event with a few organisers |
be able to share the guest list for an event with my fellow organizers easily |
I can inform them of any changes that I have made |
|
event planner |
filter my guests based on dietary requirements |
so that I can plan my event accordingly |
|
event planner specialising in conferences and recruitment talks |
be able to specify the dress code of the event |
ensure that the guests will be appropriately attired |
|
event planner specialising in government and official conferences |
be able to know who the VIP guests are and how many of them there are |
make appropriate accommodation for them |
|
event planner |
have the tickets to contain a QR code instead of using the guest’s phone number |
scan them using a smart phone or any other phone with scanning capability |
Appendix C: Use Cases
(For all use cases below, the System is Invités and the Actor is the user, unless specified otherwise)
C.1. Use case: Import guest data and update payment status
Actor: Application User - Event Planner
MSS
-
User opens application and either imports csv file or adds each guest in the application.
-
System asks user to enter a command.
-
User enters a command to mark those who have paid.
-
System updates the file accordingly.
Use case ends.
C.2. Use case: Input event details and edit venue details
Actor: Application User - Event Planner
MSS
-
User opens application.
-
System asks user to enter a command.
-
User enters a command to enter event details.
-
System shows the specified event name, date, venue, start time and tags.
-
User enters a command to edit venue field.
-
System shows the event name, date , start time, tags and updated venue.
Use case ends.
C.3. Use case: Filter guest list based on status of payment and mass email those who have not paid
Actor: Application User - Event Planner
MSS
-
User opens application.
-
System asks user to enter a command.
-
User enters a command to filter out those who have yet to pay.
-
System shows an indexed list of these guests with their names, phone numbers, email address, payment status, attendance status and tags specified, if there are people in that category.
-
User enters a command to email all in the currently displayed list, to remind them to make the payment.
-
System sends all guests in the "not paid" list an email to remind them.
Use case ends.
C.4. Use case: Filter based on specific requirements and mass email all guests
Actor: Application User - Event Planner
MSS
-
User opens application and either imports csv file or adds each guest in the application.
-
System asks user to enter a command.
-
User enters a command to filter guests based on a requirement specified (e.g. dietary requirement).
-
System displays list of all such guests, displaying their name, phone number, email address, payment status, attendance status and tags, if there are people in that category.
-
User then enters command to list all guests.
-
System displays everyone on the guest list along with their name, phone number, email address, payment status, attendance status and tags.
-
User enters command to remind all guests about the event.
-
System sends all guests an email reminding them about the event.
Use case ends.
C.5. Use case: Review guest details while organising the event
Actor: Application User - Event Planner
MSS
-
User opens application and either imports csv file or adds each guest in the application.
-
System will display the list of guests with details of each guest, such as name, phone number, email address, payment status, attendance status and tags, such as, dietary requirements, VIP, etc in a row for ease of access. System will display the general information of the event on the left of the list of guests, such as name, date, time and venue of event, dress code, number of people attending the event so far, etc. System asks user to enter a command.
-
User enters command to filter by some specific requirement, so that user is able to make arrangements accordingly.
-
System lists all guests with the specified requirement, if available.
Use case ends.
C.6. Use case: Sending tickets to individual guests
Actor: Application User - Event Planner
MSS
-
User opens application and either imports csv file or adds each guest in the application.
-
User keys in email command to send an email to an individual guest
-
System will generate a QR code, which has the guest’s unique ID encoded within it
-
System will email the guest their ticket, as well as details of the event.
Use case ends.
C.7. Use case: Providing smooth registration on the day of the event
Actor: Application User - Event Planner
MSS
-
User opens application and imports csv file(if they were not using the application while planning) or continues with the list on the application.
-
System asks user to enter a command.
-
User keys in command to filter the list for attendees whom are absent from the event.
-
User (manning the reception/registration desk) manually keys in the guest’s unique ID found on the ticket.
-
System runs a search to match the unique ID with those in the file.
-
If unique ID is found, attendance of that guest is marked.
-
System removes all ‘marked’ guests from display and displays only those who have yet to arrive/register.
-
User can enter a command to send an email to all in the currently displayed list (comprising of guests who have not arrived or registered yet).
-
System sends an email to each of those guests.
Use case ends.
Extensions
-
6a. User enters command to unmark a guest who was marked as present accidentally.
-
6b. System unmarks the guest.
Use case resumes from step 7.
C.8. Use case: Importing large number of guests into the guest list of an event
Actor: Application User - Event Planner Guarantees: Import will not result in the overwriting or deletion of an existing guest.
MSS
-
User opens application.
-
System asks user to enter a command.
-
User keys in import command along with the file path of the csv file.
-
System parses the csv file and add guests into the guest list one at a time.
-
System shows CSV entries of guests which failed to be imported along with their associated error messages
Use case ends.
Extensions
-
3a. User keys in an invalid file path.
-
3a1. System shows an error message.
-
Use case resumes at step 2
-
4a. User provided malformed CSV file or inappropriate guest fields (eg. email with no @ character).
-
4a1. System skips the addition of the guest into the guest list and saves it.
-
Use case resumes at step 4
-
5a. User provided CSV file with a guest that already exists in the current guest list.
-
5a1. System skips the addition of the guest into the guest list and saves it.
-
Use case resumes at step 4
C.9. Use case: Export guest list of an event (to CSV file format)
Actor: Application User - Event Planner
MSS
-
User opens application
-
System asks user to enter a command
-
User keys in export command along with the filename of the csv file
-
System formats and saves guests into CSV format
Use case ends.
Extensions
-
3a. User keys in an invalid filename or a filename that already exists
-
3a1. System shows an error message.
-
Use case resumes at step 2
Appendix D: Non Functional Requirements
-
Should work on any mainstream OS as long as it has Java
9or higher installed. -
Should be able to hold up to 1000 guests without a noticeable sluggishness in performance for typical usage.
-
A user with above average typing speed for regular English text (i.e. not code, not system admin commands) should be able to accomplish most of the tasks faster using commands than using the mouse.
-
Command line interface has to be the primary source of input. GUI is to be used only to give visual feedback to the user.
-
Data should be stored locally in a text file that can be edited by user. Database Management System (DBMS) must not be used to store data.
-
OOP has to be followed.
-
The software has to be independent of platforms of any kind.
-
The software should work without needing an installer.
-
Only free, open-source, permissive license software that do not require any installation and do not violate any other constraints can be used.
Appendix F: Instructions for Manual Testing
Given below are instructions to test the app manually.
| These instructions only provide a starting point for testers to work on; testers are expected to do more exploratory testing. |
F.1. Launch and Shutdown
-
Initial launch
-
Download the jar file and copy into an empty folder
-
Double-click the jar file
Expected: Shows the GUI with a set of sample guest information. The window size may not be optimal.
-
-
Saving window preferences
-
Resize the window to an optimal size. Move the window to a different location. Close the window.
-
Re-launch the app by double-clicking the jar file.
Expected: The most recent window size and location is retained.
-
F.2. Filtering a guest
-
Filtering a guest
-
Test case:
filter a/absent
Expected: Details of guests who are absent (i.e. are labelled as "absent" in the Attendance field) will be listed. The number of guests listed will be shown in the status message. -
Test case:
filter a/absent pa/paid t/Vegetarian
Expected: Details of guests who are absent (i.e. are labelled as "absent" in the Attendance field), have paid (i.e. are labelled as "paid" in the Payment field) and have the "Vegetarian" tag will be listed. The number of guests who are listed will be shown in the status message. -
Test case:
filter pa/paying
Expected: No guest is listed. Error details shown in the status message. Status bar remains the same. -
Other incorrect filter commands to try:
filter,filter prefix/(where the prefix is any other character besides 'pa', 'a' and 't') ,filter prefix(where prefix given does not have '/' or has any other special character), etc.
Expected: Similar to previous.
-
F.3. Finding a guest
-
Finding a guest
-
Test case:
find n/john
Expected: Details of guests who have 'john' in their names. The number of guests listed will be shown in the status message. -
Test case:
find e/(Non-matching keyword)
Expected: No guest is listed. Status bar remains the same. -
Other incorrect find commands to try:
find,find prefix/(where the prefix is any other character besides 'n', 'p' and 'e') ,find prefix(where prefix given does not have '/' or has any other special character), etc.
Expected: No guest is listed. Error details shown in the status message. Status bar remains the same.
-
F.4. Adding event details
-
Adding event details
-
Test case: 'add_event n/Wedding d/10/01/2019 v/XYZ Hotel st/10:00 AM'+ Expected: Event details will be displayed in the event details panel. The number of days left to the event will be displayed in the status bar footer.
-
Test case: 'add_event n/CFG Career Talk d/31/02/2019 v/LT 5 st/10:00 AM'+ Expected: No event details are added. Error details are shown in the status message. Event details display remains intact.
-
Other incorrect commands to try:
add_event,add_event x, `add_event n/CFG Career Talk d/10/11/2019 v/LT 9 st/10' , etc.
Expected: No event details are added. Error details are shown in the status message. Event details display remains intact.
-
F.5. Deleting event details
-
Deleting the existing event details
-
Prerequisites: Event details initialised by the user must exist.
-
Test case:
delete_event
Expected: Details of the event are deleted and details are not displayed in the event details panel. Status bar is updated. -
Test case:
delete_event 0
Expected: Event details are not deleted. Error details are shown in the status message. Status bar remains the same. -
Other incorrect delete_event commands to try:
delete_event n(where n is some parameter), etc.
Expected: Event details are not deleted. Error details are shown in the status message. Status bar remains the same.
-
F.6. Editing event details
-
Editing the existing event details
-
Prerequisites: Event details initialised by the user must exist.
-
Test case: 'edit_event d/10/02/2019'
Expected: Event details will be updated in the event details panel. The number of days left to the event will be updated in the status bar footer. -
Test case: 'edit_event e/Novotel Tour Eiffel'+ Expected: No event details are edited. Error details are shown in the status message. Event details display remains intact.
-
Other incorrect commands to try:
edit_event,edit_event x, `edit_event d/31/02/2019' , etc.
Expected: No event details are edited. Error details are shown in the status message. Event details display remains intact.
-
F.7. Sending individual emails
-
Send individual guests an email with a QR code attachment
-
Test case:
email 1-
Expected: Assuming there is at least one guest, UI Window opens to allow user input. If all inputs are valid, email is sent to the guest at
INDEX1.
-
-
Incorrect commands to try:
email The President,emailLL,email 12.3, etc.-
Expected: No email sent due to incorrect parameters.
-
-
F.8. Sending all guests an email
-
Send all guests an email (no QR code attachments for this command)
-
Test case:
emailAll-
Expected: Assuming there is at least one guest, UI Window opens to allow user input. If all inputs are valid, email is sent to all guests.
-
-
Incorrect commands to try:
emailAll Celebrities,emailAllLL, etc.-
Expected: No email sent due to incorrect parameters.
-
-
F.9. Sending a group of guests an email
-
Send an email to a group of guests (no QR code attachments for this command)
-
Test case:
emailSpecific t/Veg-
Expected: Assuming there is at least one guest with tag
Vegin the filtered list, UI Window opens to allow user input. If all inputs are valid, email is sent all guests with tagVeg
-
-
Incorrect commands to try:
emailSpecific Puppies,emailSpecific t/@&@etc.-
Expected: No email sent due to incorrect parameters.
-
-
F.10. Importing and exporting guests
-
Importing guests from CSV file
-
Prerequisites: Delete all guests before each test case. Execute
listfollowed byclear. -
Test case: Download sample.csv into directory where application Jar file is located and execute
import sample.csv
Expected: All guests are imported fromtest.csv. No errors are found. -
Test case: Download errorsample.csv into directory where application Jar file is located and execute
import errorsample.csv
Expected: No guests are imported fromtest.csv. Popup window shows all import errors. -
Other incorrect commands to try:
import,import test, etc
Expected: No guests are imported. Error details shown in the status message.
-
-
Exporting all guests
-
Prerequisites: List all guests using
list. There must be at least 1 guest in guest list panel after thelistcommand. Notest.csvfile should be found in same directory of application Jar file. -
Test case:
export test.csv
Expected: All guests are exported intotest.csv.test.csvcan be found in the same directory of the application Jar file. -
Other incorrect commands to try:
export,export test, etc Expected: No guests are exported. Error details shown in the status message.
-
-
Exporting filtered guest to CSV file
-
Prerequisites: There must be guests that are absent. Filter all absent guests using
filter a/ABSENT. -
Test case: 'export test.csv'
Expected: Only guests that are absent are exported intotest.csv.test.csvcan be found in the same directory of the application Jar file.
-
-
Exporting to file that already exists
-
Prerequisites: There must be guests in the guest list panel. Export guests using
export test.csv. -
Test case:
export test.csv
Expected: No guests are exported. Error details shown in the status message.
-
-
Exporting empty guest list
-
Prerequisites: guest list panel in user interface must be empty.
-
Test case:
export test.csv
Expected: No guests are exported. Error details shown in the status message.
-
F.11. Guest preview
-
Displaying guest in guest preview
-
Prerequisites: Have guests in guest list.
-
Test case: Click on any guest in guest list panel.
Expected: Guest details should show up in guest preview. Any command that successfully modifies the underlying guest list (uselistto see underlying guest list) will clear the person preview. Note:filterandfindis not considered to be modifying the guest list.
-
F.12. Generation of UID details in add_guest command
-
Setting the UID for each guest in the guest list.
-
Test case:
add_guest n/John p/98765432 e/f@gmail.com pa/PAID a/ABSENT u/00000 t/NORMAL t/NoShrimp t/NORMAL
Expected: As the field for the UID is set to00000, the program will generate a random 6 digit UID for the user. -
Test case:
add_guest n/Doe p/98725432 e/g@gmail.com pa/PAID a/ABSENT u/00001 t/NORMAL t/NoShrimp t/NORMAL
Expected: As the field for the UID is set to00001, the program will treat this is a User defined UID and add the person with the UID set to00001. -
Test case:
add_guest n/Jon p/98765422 e/d@gmail.com pa/PAID a/PRESENT u/0000 t/NORMAL t/NoShrimp t/NORMAL
Expected: As the field for the UID is set to0000which is an invalid input as the UID has to be at least 5 characters, the program will display an error message. -
Test case:
add_guest n/Do p/98765232 e/g@gmail.com pa/PAID a/PRESENT u/000000000000000000001 t/NORMAL t/NoShrimp t/NORMAL
ExpectedL As the field for the UID is set to000000000000000000001which has 21 characters which is an invalid input as the UID cannot be more than 20 characters, the program will display an error message.
-
F.13. Marking Attendance details
-
Marking attendance using the Unique ID (UID) to set the attendance to
PRESENTwith themarkcommand.-
Prerequisites: The guest list must be populated with guests. At least one guest has the UID
00001. -
Test case:
mark 00001
Expected: The person whose UID is00001will have the attendance field marked asPRESENT. -
Test case:
mark [UID not in the guest list]
Expected: An error will show that there is no such person in the guest list. -
Test case:
mark 0001
Expected: The UID is in the wrong format and will show an error message. -
Test case:
mark 0101010101010101010101010101
Expected: the UID is in the wrong format and will show an error message.
-
-
Marking attendance using the Unique ID (UID) to set the attendance to
ABSENTwith theunmarkcommand.-
Prerequisites: The guest list must be populated with guests. At least one guest has the UID
00001. -
Test case:
unmark 00001
Expected: The person whose UID is00001will have the attendance field marked asABSENT. -
Other test cases: similar to
markcommand as shown above
-
F.14. Add tags to all guests in the list
-
Adds a set of tags to all the guests in the list
-
Test case:
addTag t/Veg t/Platinum-
Expected: Adds the tags
VegandPlatinumto all guests in the current filtered list
-
-
Test case:
addTag t/(@#(-
Expected: No tags are added as the tags specified are not alphanumeric
-
-
Incorrect commands to try:
addTag t/t/,addTag, etc.-
Expected: No tags added due to incorrect parameters.
-
-
F.15. Remove tags from all guests in the list
-
Removes a set of tags from all the guests in the list
-
Test case:
removeTag t/Veg t/Platinum-
Expected: Removes the tags
VegandPlatinumfrom all guests who have these tags
-
-
Test case:
removeTag t/Veg t/Platinum-
Expected: If no guests in the current filtered list have tags
VegorPlatinum, system throws an error
-
-
Test case:
removeTag t/(@#(-
Expected: No tags are removed as the tags specified are not alphanumeric
-
-
Incorrect commands to try:
removeTag t/t/,removeTag, etc.-
Expected: No tags removed due to incorrect parameters.
-
-