By: Team F09-3 Since: Sep 2018 Licence: MIT
- 1. Introduction
- 2. Quick Start
- 3. Features
- 3.1. Viewing help :
help - 3.2. Listing all guests :
list - 3.3. Locating guests by name, phone number or email address:
find - 3.4. Adding a guest’s details:
add_guest - 3.5. Editing a guest’s details:
edit_guest - 3.6. Deleting a guest’s details:
delete_guest - 3.7. Adding a set of tags to all guests :
addTag - 3.8. Removing a set of tags from all guests :
removeTag - 3.9. Importing guests from CSV file :
import - 3.10. Exporting guests to CSV file :
export - 3.11. Marking a guest as present :
mark - 3.12. Marking a guest as absent :
unmark - 3.13. Starting mass attendance marking :
start_marking- Coming in v2.0 - 3.14. Stopping mass attendance marking :
stop_marking- Coming in v2.0 - 3.15. Filtering the guest list based on specified parameters :
filter - 3.16. Sending emails to individual guests :
email - 3.17. Sending an email to all guests :
emailAll - 3.18. Sending emails to specific groups of guests :
emailSpecific - 3.19. Adding details about your event:
add_event - 3.20. Editing your event’s details :
edit_event - 3.21. Deleting your event’s details :
delete_event - 3.22. Undoing previous command :
undo - 3.23. Redoing the previously undone command :
redo - 3.24. Exiting the program :
exit - 3.25. Saving your data
- 3.1. Viewing help :
- 4. FAQ
- 5. Enabling Email Services
- 6. CSV Guest List Format
- 7. Command Summary
1. Introduction
Invités is a desktop application targeted at event managers and planners. The application allows you to efficiently organise, cater, and manage large events such as weddings, school gatherings, orientation camps, etc. The application works on a command line interface, where you can key in the commands specified in our User Guide into a command box to perform a task. Some of the main distinguishing features of the application include the ability to send mass emails to guests, keep track of payments, and take note of guest attendance. The application also allows you to input the proposed or confirmed details of your event and provides a countdown to the event date. To add to these features, by employing a standardised format, the application is able to take in Comma Separated Values (CSV) files and import the guest list for a particular event. This eliminates the need to key in the guest details manually and gives you an alternative if you decide to organise another event using the same guest list.
You will have an easier time managing the reception of your event as you will be equipped with tools that will minimise errors in catering, organising, and ordering. Moreover, our application aims to reduce your frustration while planning events by packaging your needs in a platform that is more user-friendly, personalised, and efficient.
The main purpose of this User Guide is to give you a detailed overview of all the features in our application and how to use them.
2. Quick Start
-
Ensure you have Java version
9or later installed in your Computer. -
Download the latest jar file from the GIT repository here.
-
Place the jar file where your home directory resides
-
Double click on the jar file and wait a couple of seconds as the application loads. If you’re successful, a main screen will load similar to the one shown below:
|

-
As the Command Line Input is your primary method of manipulation, here are some example commands that you can use:
-
help: Displays a summary of the list of commands that the application offers. -
add_guest: Adds a guest to the guest list. -
delete_guest: Deletes an entry from the guest list. -
mark: Marks the attendance of a guest fromABSENTtoPRESENT. -
exit: exits the application.
-
-
You should type the command in the command box and press Enter to execute it.
e.g. typinghelpand pressing Enter will open the help window. -
Please refer to Section 3, “Features” subsection to see more detailed documentation of the functions that are included in this application
-
If you would like to perform emailing services through our application, please complete the steps as listed in Section 5, “Enabling Email Services”
3. Features
Command Format
-
Words in
UPPER_CASEare the parameters to be supplied by you e.g. inadd_guest n/NAME,NAMEis a parameter which can be used asadd_guest n/Bob Lee. -
Items in square brackets are optional e.g
n/NAME [t/TAG]can be used asn/Bob Lee t/VIPor asn/Bob Lee. -
Items with
… after them can be used multiple times including zero times e.g.[t/TAG]…can be used ast/VIP,t/VIP t/Vegetarianetc. -
You can specify parameters in any order e.g. if the command specifies
n/NAME p/PHONE_NUMBER,p/PHONE_NUMBER n/NAMEis also acceptable.
3.1. Viewing help : help
Displays a summary of the list of commands that the application offers
Format: help
You should not enter any characters after the command word, only extra spaces are allowed! For example, the input help extra_characters or help 182$* will be incorrect, but help (i.e. with spaces) will be correct.
|
3.2. Listing all guests : list
Shows a list of all guests in the guest list.
Format: list
You should not enter any characters after the command word, only extra spaces are allowed! For example, the input list extra_characters or list 182$* will be incorrect, but list (i.e. with spaces) will be correct.
|
3.3. Locating guests by name, phone number or email address: find
Find guests whose names, phone numbers and/or email addresses
contain any of the given keywords.
Format: find n/KEYWORD p/MORE_KEYWORDS e/MORE_KEYWORDS
Example: find n/NAME p/PHONE e/EMAIL
Examples:
-
find n/John
You will be shown a list that contains the entries ofjohnandJohn Doe -
find n/Betsy n/Tim n/John
You will be show a list containing entries of any guest having namesBetsy,Tim, orJohn -
find n/alex p/92746838 e/johndoe@gmail.com
You will be show a list containing entries of any guest having the nameAlex, phone number92746838, or email addressjohndoe@gmail.com -
find n/david n/edan
You will be shown a list that contains the entries of any guests having the namedavidandedan -
find n/david edan
You will be shown a list that contains the entries of any guests having the namedavidbut notedan
3.4. Adding a guest’s details: add_guest
Adds a guest to the guest list.
No spaces or special characters allowed in Payment and Attendance.
Payment accepts "PAID", "NOTPAID" , "PENDING" or "N.A.".
Attendance accepts "ABSENT", "PRESENT" or "N.A."
Payment and attendance are case-insensitive.
Unique ID (UID) accepts a minimum of 5 characters and a maximum of 20 characters
If any options other than the ones given are entered, the guest will be added if
other fields are fine, but payment and/or attendance will be blank.
Format: add_guest n/NAME p/PHONE_NUMBER e/EMAIL pa/PAYMENT a/ATTENDANCE u/UID [t/TAG]…
A guest can have any number of tags (including 0)
UID can be generated by the program by entering u/00000,Other values of UID will be treated as a user-defined UID. |
Examples:
-
add_guest n/Bob Lee p/81720172 e/boblee@gmail.com a/Absent pa/NOTPAID u/00001 t/VIP t/Vegetarian -
add_guest n/John Doe p/91028392 e/johndoe@gmail.com a/Present pa/PAID u/00002 t/Groom t/NonVegetarian -
add_guest n/Carl Sagan p/85174321 e/carlsagan@gmail.com a/Absent pa/PAID u/00000 t/VIP(will trigger randomly generated UID) -
add_guest n/David Li p/83186624 e/davidli@gmail.com pa/PENDING a/ABSENT u/00003(will be treated as a User defined UID)
3.5. Editing a guest’s details: edit_guest
Edits an existing guest entry in the guest list.
No spaces or special characters allowed in Payment and Attendance.
Payment accepts "PAID", "NOTPAID" , "PENDING" or "N.A.".
Attendance accepts "ABSENT", "PRESENT" or "N.A."
Payment and attendance are case-insensitive.
Format: edit_guest INDEX [n/NAME] [p/PHONE_NUMBER] [e/EMAIL] [pa/PAYMENT] [a/ATTENDANCE]
[t/GUEST_TYPE] [t/DIET]…
| Unique ID (UID) cannot be changed by edit_guest. |
Examples:
-
edit_guest 2 n/Bob Chan
Edits the name of the 2nd guest to beBob Chan.
3.6. Deleting a guest’s details: delete_guest
Deletes the specified guest from the guest list.
Format: delete_guest INDEX
Examples:
-
list
delete_guest 2
Deletes the 2nd guest in the guest list. -
find n/Betsy
delete_guest 1
Deletes the 1st guest in the results of thefindcommand.
3.7. Adding a set of tags to all guests : addTag
This command allows you to add a set of tags to all guests in the current filtered guest list.
Format: addTag [t/TAG]…
Examples:
-
addTag t/Veg t/VIP
You will add the tagsVegandVIPto all guests in the current filtered list. -
addTag t/@
This will present you with an error as all your tags must be alphanumeric. -
addTag
You will receive an error message as you have provided empty tags.
3.8. Removing a set of tags from all guests : removeTag
This command allows you to remove a set of tags from all guests in the current filtered guest list.
Format: removeTag [t/TAG]…
Examples:
-
removeTag t/Veg t/VIP
You will remove the tagsVegandVIPfrom all guests in the current filtered list. -
removeTag
This will present you with an error, as you have not provided any tags to delete. -
removeTag t/@!*
This will present you with an error, as all your tags must be alphanumeric.
3.9. Importing guests from CSV file : import
Import multiple guests with data from a specified CSV file. To create your own CSV file for importing guests, please see Section 6: "CSV Guest List Format" for the accepted format.
Format: import FILE_PATH
-
This command only adds guests into the current guest list. No existing guest in the guest list will be deleted due to the import.
-
Adds all guests specified in the CSV file specified by
FILE_PATH -
FILE_PATHshall only be a relative or an absolute file path.-
Relative file path is relative to where the application Jar file is located.
-
-
There is no guaranteed ordering of guests after each import.
-
Importation of guests which already exist will be skipped.
-
A guest will be classified as an existing guest if it has the same name and matching phone number or email address with an existing guest in the guest list.
-
-
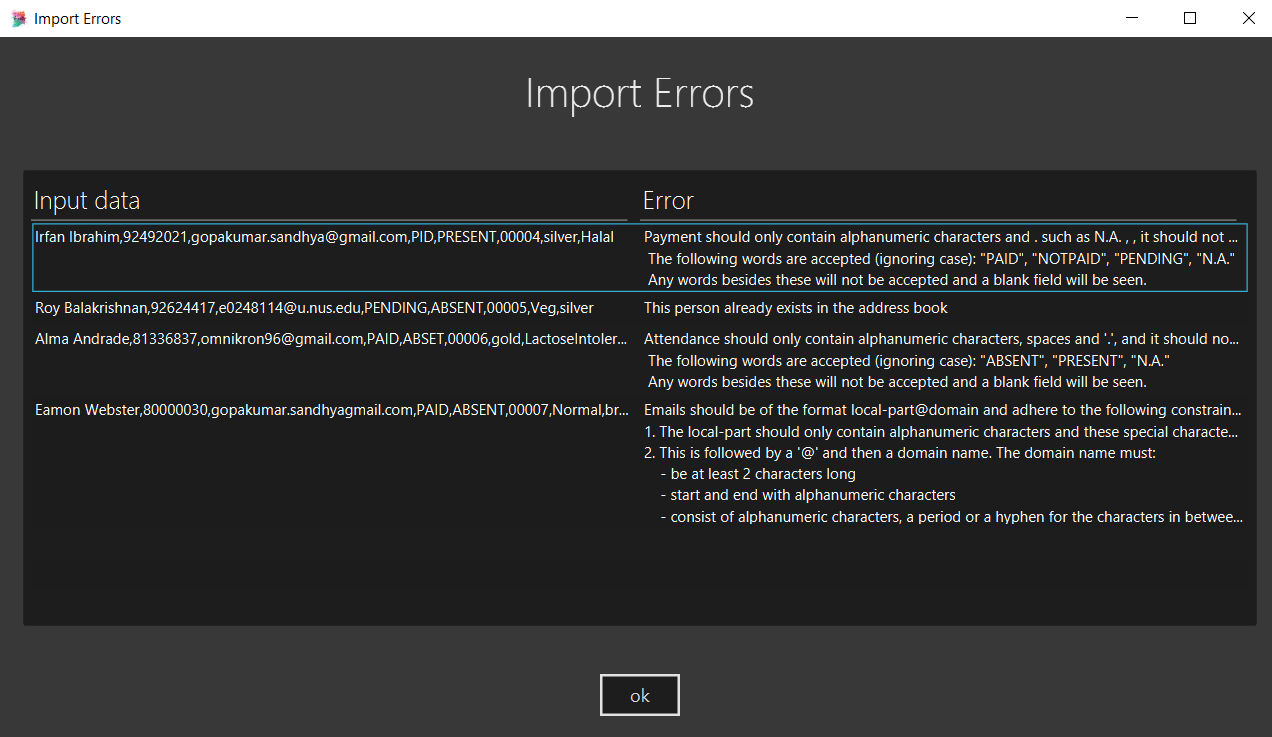
Importation of badly formatted guests in the CSV file will be skipped.
-
The CSV guest entries which are badly formatted or those which corresponds to an existing guest in the guest list, will trigger an import report window as shown in figure 2.
|
Examples:
-
import directory/subdirectory/guestlist.csv
You will populate the guest list with the data imported from the CSV file in the specified path.
3.10. Exporting guests to CSV file : export
Exports guests' data in the guest list to a specified CSV file. Allows you to share your guest list easily using the exported CSV file. The format of guest fields in the CSV file is the same format as the import command and can be found in Section 6: "CSV Guest List Format".
Format: export FILE_PATH
Examples:
-
export directory/subdirectory/guestlist.csv
You will export the currently filtered guest list entries into a CSV file in the specified path.
3.11. Marking a guest as present : mark
Marks a guest as present using a unique ID (UID) that was assigned to them upon adding them into the guest list.
This will also update the attendance field associated with the guest to PRESENT.
Format: mark [UID]
UID does not use the u/ prefix.UID only accepts a string of numbers alphanumeric characters between 5 to 20 characters inclusive,
other characters will trigger an invalid command format error.
|
Examples:
-
mark 543654You will set the guest with UID543654asPRESENT. -
mark A345654MYou will set the guest with UIDA345654MasPRESENT. -
mark ALPHAYou will set the guest with UIDALPHAasPRESENT.
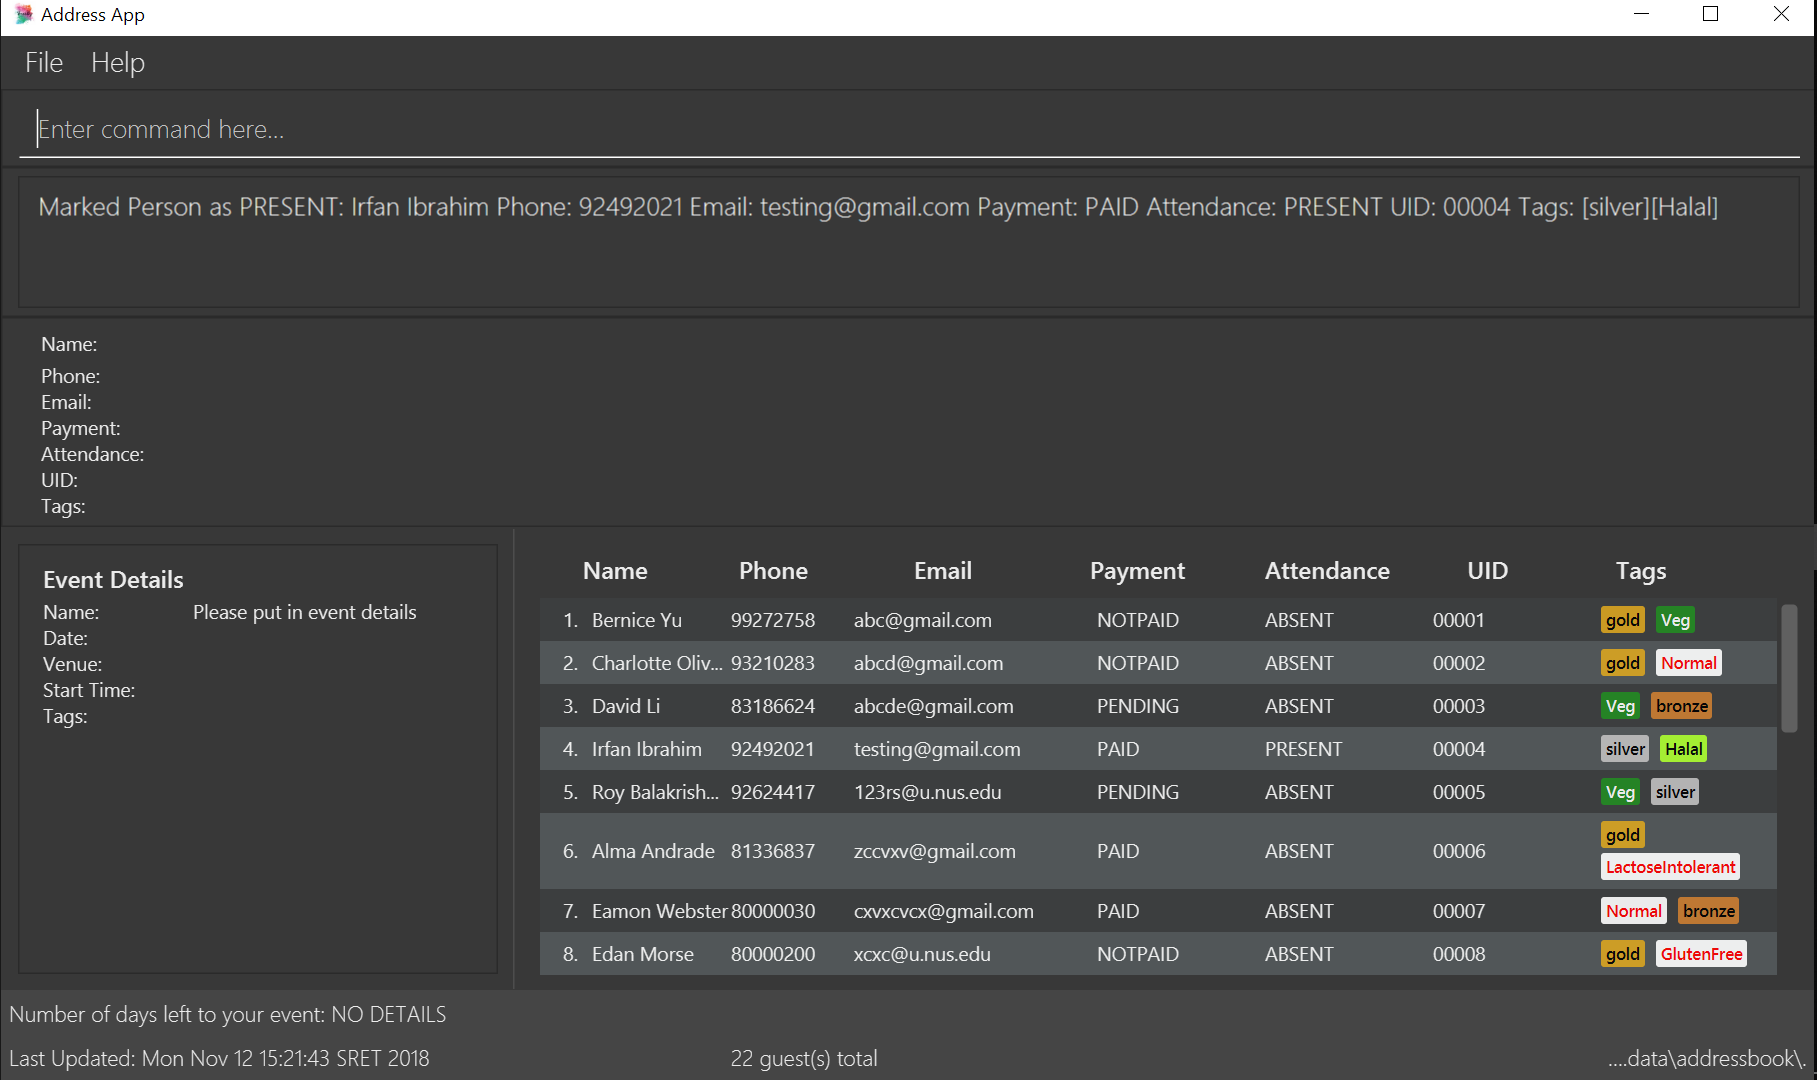
Figure 3 - User interface after Mark Command : Successful execution of MarkCommand
3.12. Marking a guest as absent : unmark
Marks a guest as absent using a unique ID (UID) that was assigned to them upon adding them into the guest list.
This will also update the attendance field associated with the guest to ABSENT.
Format: mark [UID]
UID does not use the u/ prefix.UID only accepts a string of numbers alphanumeric characters between 5 to 20 characters inclusive,
other characters will trigger an invalid command format error.
|
Examples:
-
unmark 543654You will set the guest with UID543654asABSENT. -
mark A345654MYou will set the guest with UIDA345654MasABSENT. -
mark ALPHAYou will set the guest with UIDALPHAasABSENT.
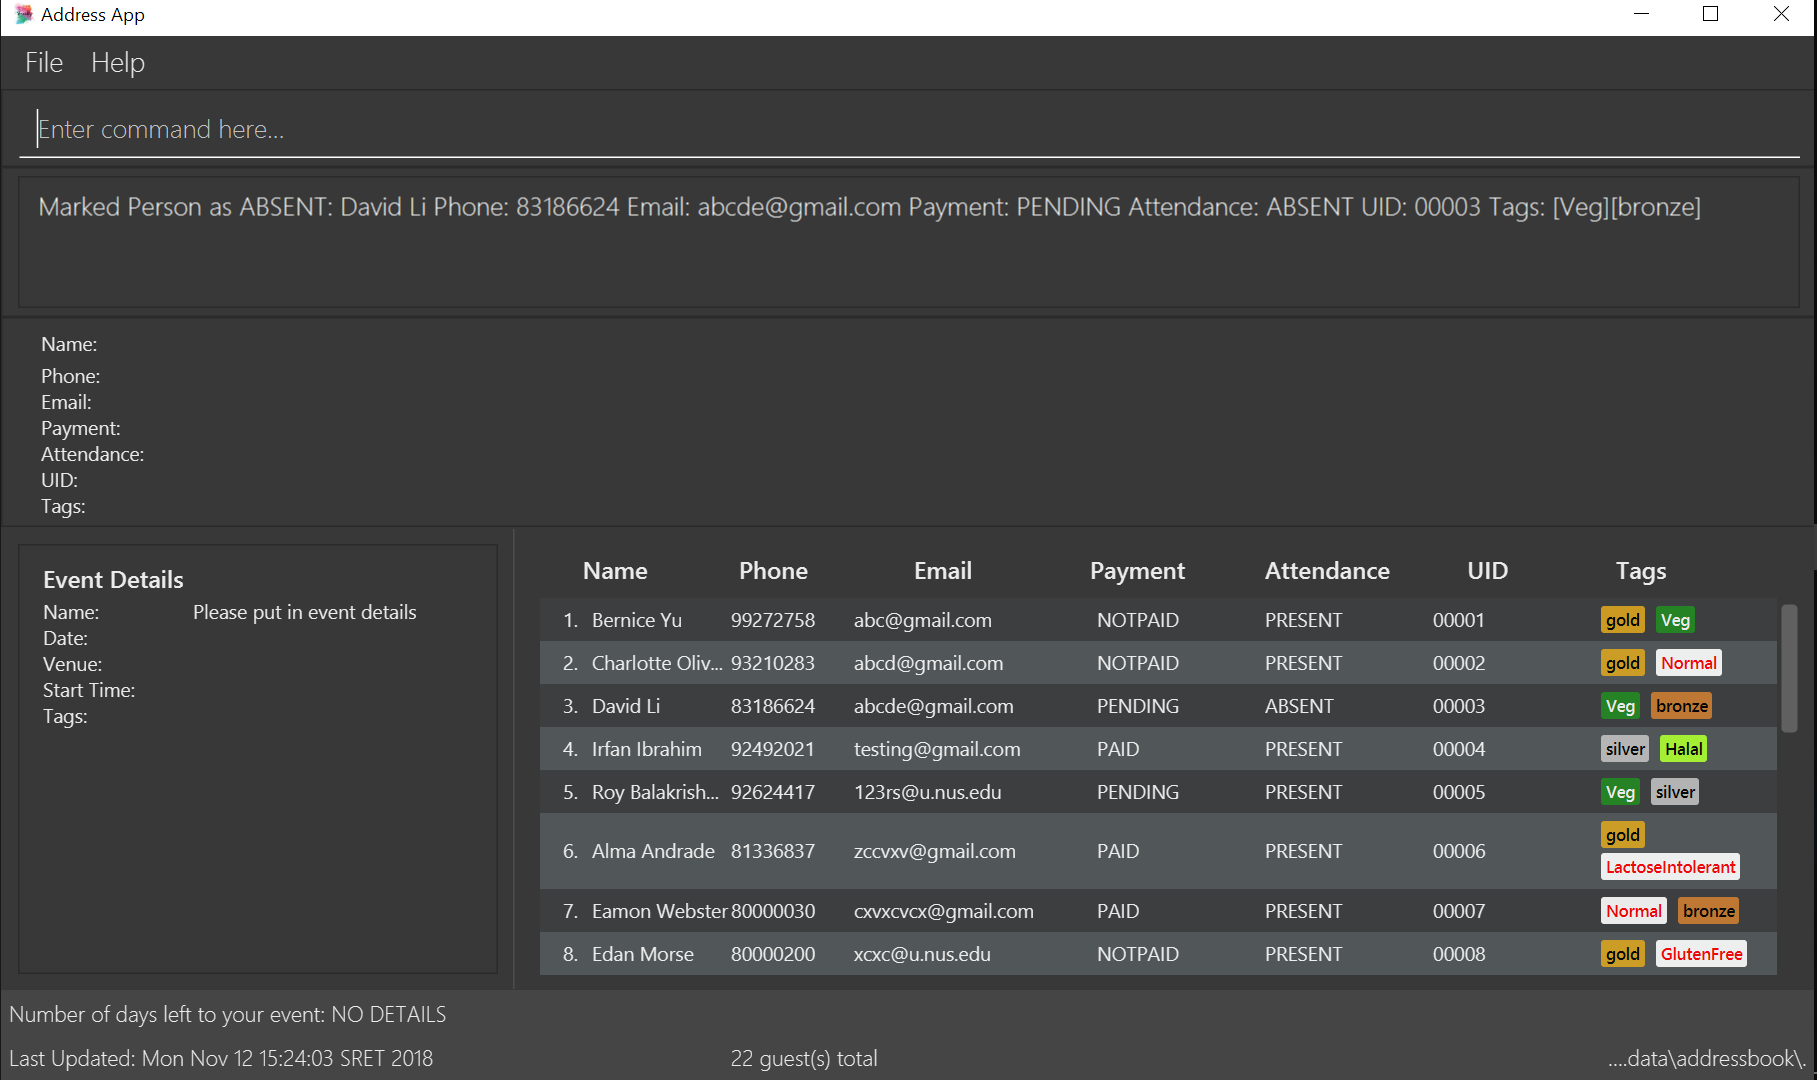
Figure 4 - User interface after Unmark Command : Successful execution of UnmarkCommand
3.13. Starting mass attendance marking : start_marking - Coming in v2.0
| This feature has not been implemented yet. Our team plans to implement this feature in an upcoming version, v2.0. |
Start the mass attendance marking mode. Allows you to mark attendance without using
the mark prefix. This command will allow you to continuously mark the attendance of the attendees by keying in their Unique ID (UID)
into the command line interface
Format: start_marking + [UID]…
|
You are unable to use other commands once this mode is active. You will need to use the stop_marking command to deactivate this mode to use other commands
|
Examples:
-
start_marking+00001+708944+928372+00003…
You will mark the guests with UID of00001,708944,928372,00003asPRESENT.
3.14. Stopping mass attendance marking : stop_marking - Coming in v2.0
| This feature has not been implemented yet. Our team plans to implement this feature in an upcoming version, v2.0. |
Stops the mass attendance marking mode. Deactivates the start_marking mode to enable usage of other commands in the program
Format: stop_marking
Examples:
-
start_marking+00001+stop_marking
Initiatestart_markingmark the person with UID00001then exit the mode withstop_marking.
3.15. Filtering the guest list based on specified parameters : filter
Filters the current guest list based on the specified filter parameters. Only filters based on
payment status, attendance status and tags. Keywords should not have spaces or any
special characters.
Values accepted for Payment Status: PAID, NOTPAID, PENDING or N.A.
Values accepted for Attendance Status: PRESENT, ABSENT or N.A.
Format: filter [pa/PAYMENT_STATUS] [a/ATTENDANCE_STATUS]
[t/DIET] [t/GUEST_TYPE] [t/…]
Examples:
-
filter pa/NOTPAID a/PRESENT
You will be shown a list with guests who have yet to pay and are present at your event. -
filter a/Present t/Vegetarian
You will be shown a list with guests who are present and have a vegetarian dietary requirement.
3.16. Sending emails to individual guests : email
Please ensure you have gone through Section 5, “Enabling Email Services” first in order for this feature to work! |
With this command you can send an email, with a QR code attachment, to the guest at a specific Index
Format: email INDEX
Examples:
-
email 2-
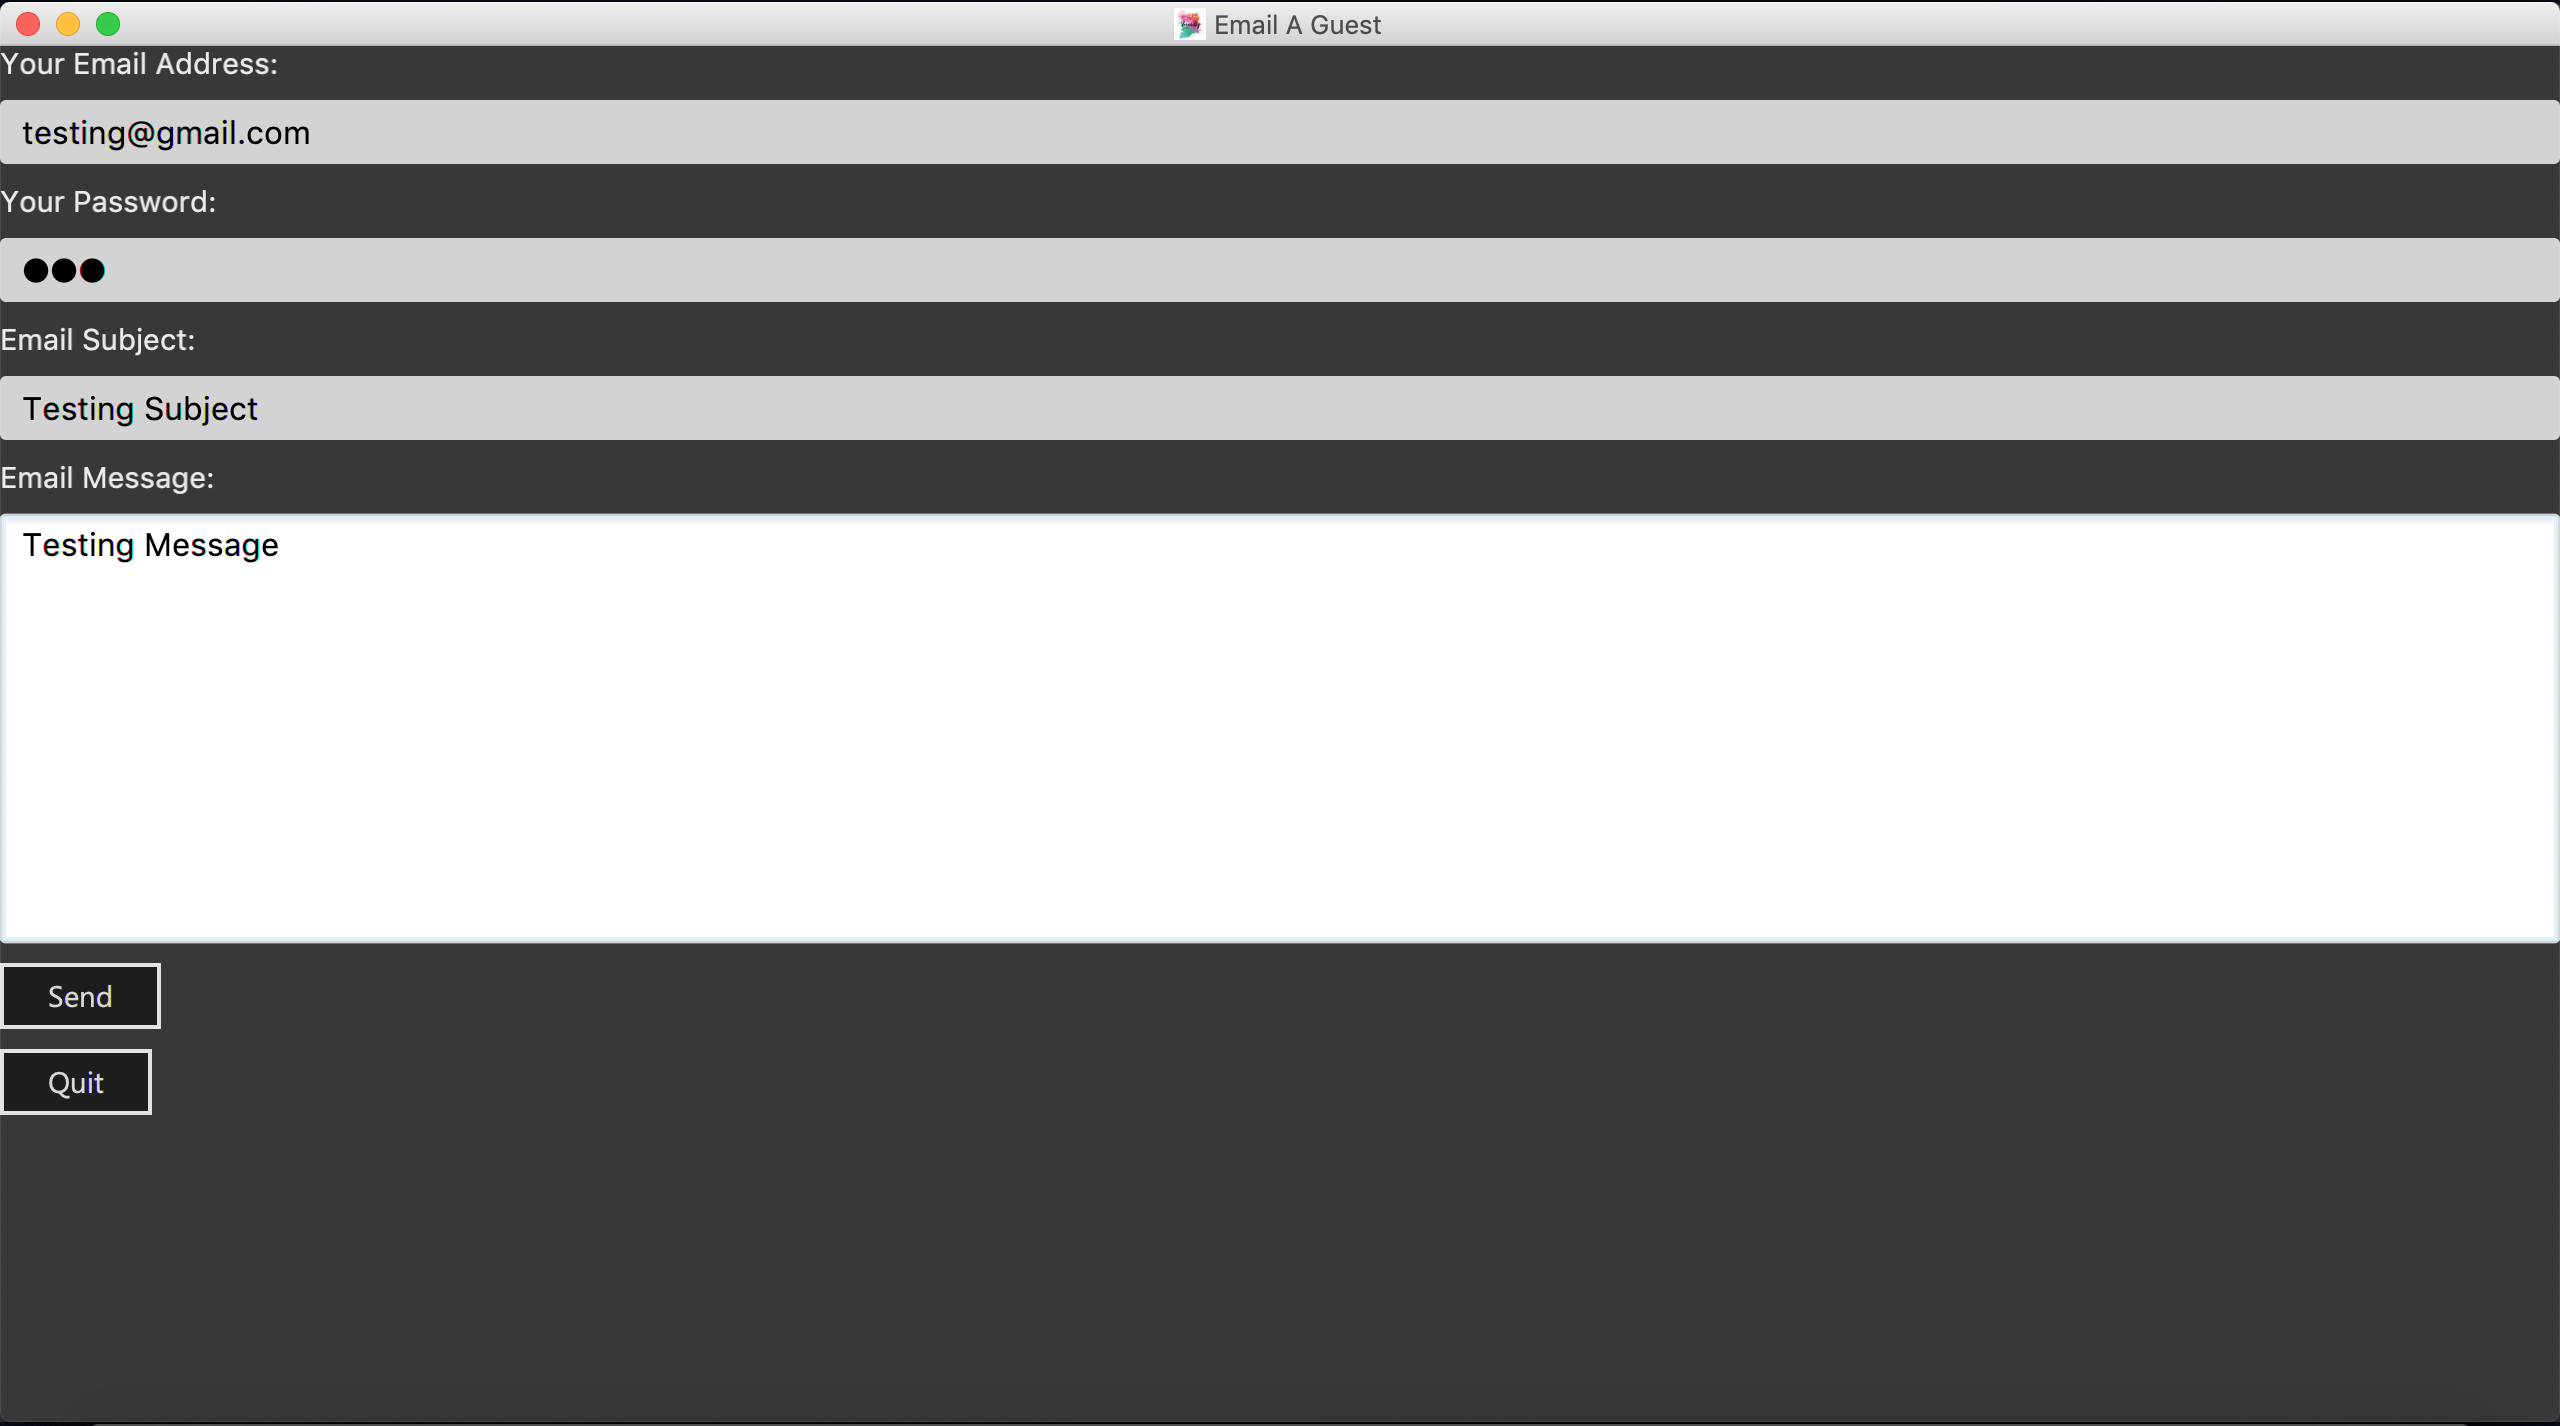
First, you will be presented with an EmailWindow similar to Figure 5 below.
-
This window is for you to input your email address, password, email subject and message.
-
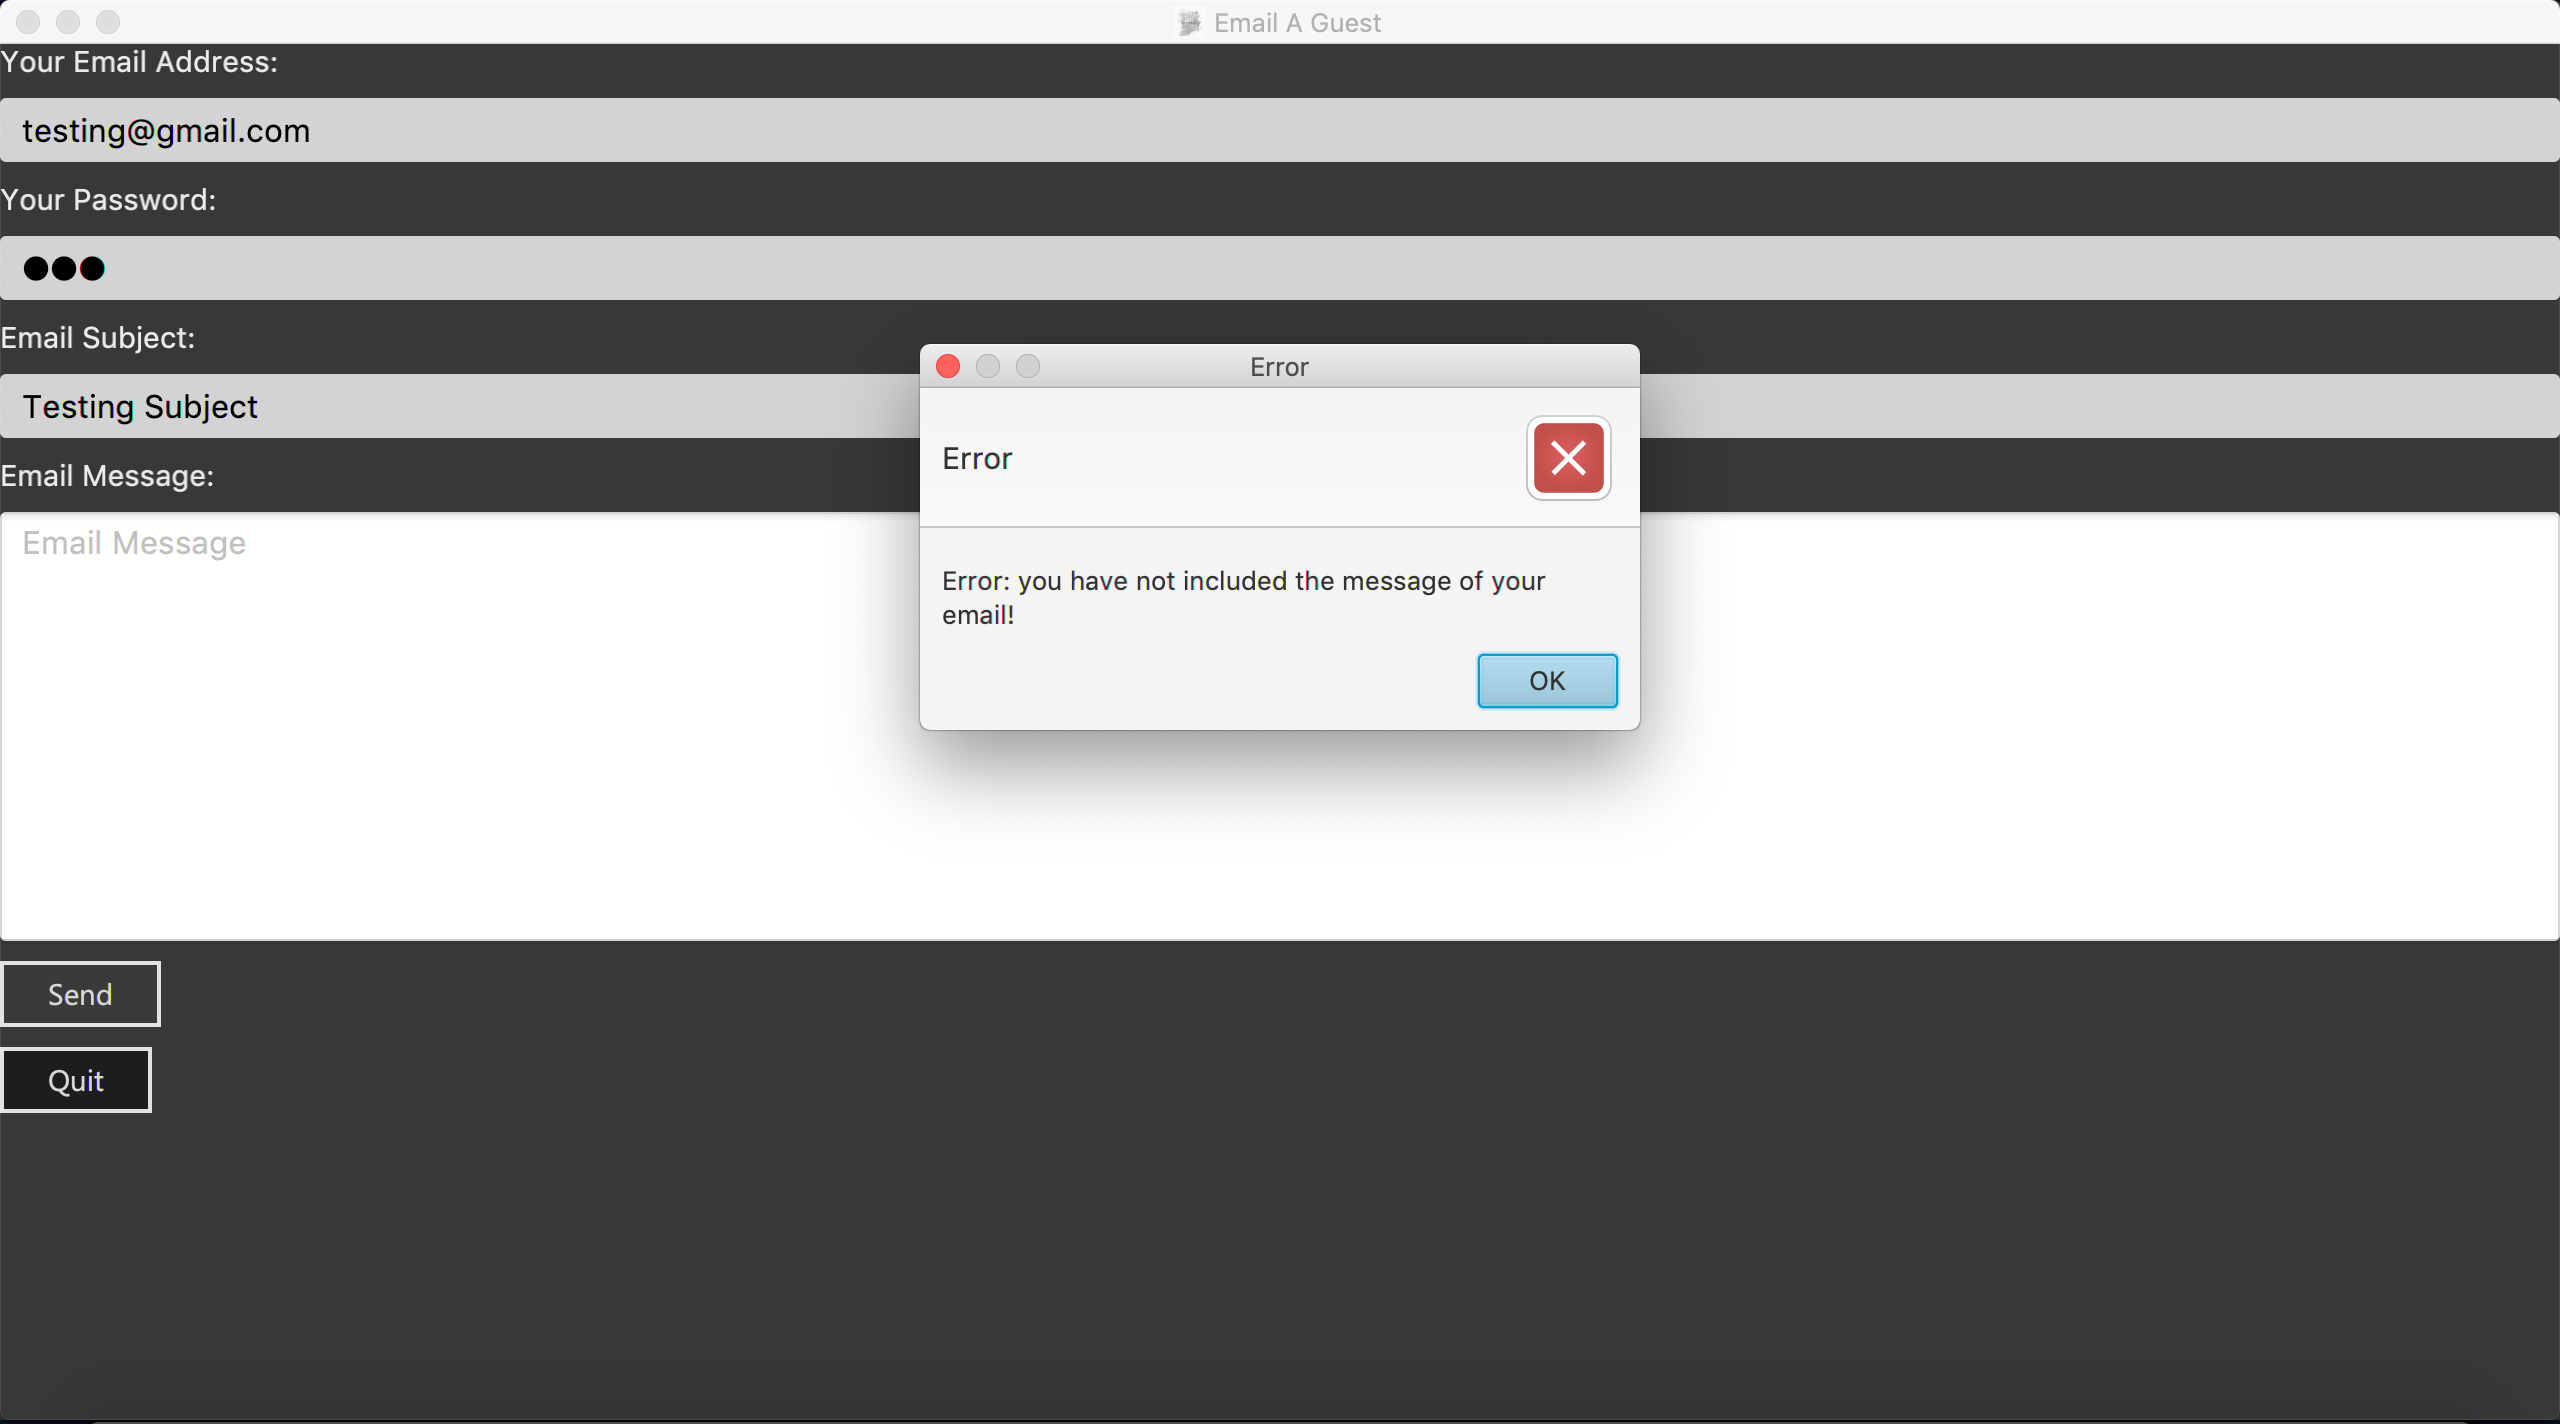
You will then need to fill in all the required fields. If you miss any of the fields and try to click the
Sendbutton, an error message will pop up like the one in Figure 6. -
Once all fields are filled, you can click the
Sendbutton to send your email to the 2nd guest in the list. You can also click theQuitbutton if you do not want to send your email. -
If you are successful, you will see a message that says
Successfully sent email!.
-
|
|
3.17. Sending an email to all guests : emailAll
Please ensure you have gone through Section 5, “Enabling Email Services” first in order for this feature to work! |
With this command you can an email (no QR code attachments for this command) to all of the guests in the current filtered list
Format: emailAll
You should not enter any characters after the command word, only extra spaces are allowed! For example, the input emailAll extra_characters or emailAll 182$* will be incorrect, but emailAll (i.e. with spaces) will be correct.
|
Examples:
-
list -
emailAll-
The command
listwill list all your guests to ensure you send an email to all guests. -
First, you will be presented with an EmailWindow similar to Figure 5 above.
-
This window is for you to input your email address, password, email subject and message.
-
You will then need to fill in all the required fields. If you miss any of the fields and try click the
Sendbutton, an error message will pop up as the one in Figure 6 above. -
Once all fields are filled, you can click the
Sendbutton to send your email to all guests in the list. You can also click theQuitbutton if you do not want to send your email. -
If you are successful, you will see a message that says
Successfully sent email!.
-
3.18. Sending emails to specific groups of guests : emailSpecific
Please ensure you have gone through Section 5, “Enabling Email Services” first in order for this feature to work! |
With this command you can send an email (no QR code attachments for this command) to all the guests with at least one of the tags specified+
Format: emailSpecific [t/TAG]…
Examples:
-
emailSpecific
This will present you with an error, as you have not provided any tags to delete -
emailSpecific t/@!*
This will present you with an error, as all your tags must be alphanumeric -
emailSpecific t/VIP t/Garbage-
This command will send an email to all the guests with a
VIPtag, assuming no guest has the tagGarbage! (You can provide suchGarbagetags!) -
First, you will be presented with an EmailWindow similar to Figure 5 above.
-
This window is for you to input your email address, password, email subject and message.
-
You will then need to fill in all the required fields. If you miss any of the fields and try click the
Sendbutton, an error message will pop up as the one in Figure 6 above. -
Once all fields are filled, you can click the
Sendbutton to send your email to all guests in the list. You can also click theQuitbutton if you do not want to send your email. -
If you are successful, you will see a message that says
Successfully sent email!.
-
3.19. Adding details about your event: add_event
Adds details such as the name, date, venue and start time of your event. Any additional details may be entered as tags.
Format: add_event n/EVENT_NAME d/DATE v/VENUE st/START_TIME [t/OTHER_TAGS]
Examples:
-
add_event n/CFG career talk d/12/01/2019 v/YIH Paris Room st/9:00 AM t/SmartCasualAttire
The event details panel will show you an event calledCFG career talkthat will take place on 12th January, 2019 at YIH Paris Room. The event will start at 9:00 AM and attendees are expected to dress in smart casual attire.
3.20. Editing your event’s details : edit_event
Edits the details of your event.
Format: edit_event [n/EVENT_NAME] [d/DATE] [v/VENUE] [st/START_TIME] [t/…]
Examples:
-
edit_event n/CFG Career Workshop t/CasualAttire
You will change the name of your event to 'CFG Career Workshop and replace the existing tags with the 'CasualAttire' tag.
3.21. Deleting your event’s details : delete_event
Deletes the event details currently present in the application.
Format: delete_event
Examples:
-
delete_event
You will delete the event details.
3.22. Undoing previous command : undo
Restores the guest list to the state before the previous undoable command was executed.
Format: undo
You should not enter any characters after the command word, only extra spaces are allowed! For example, the input undo extra_characters or undo 182$* will be incorrect, but undo (i.e. with spaces) will be correct.
|
|
Undoable commands: those commands that modify the guest list’s content ( |
Examples:
-
delete_guest 1
list
undo(reverses thedelete_guest 1command) -
select 1
list
undo
Theundocommand fails as there are no undoable commands executed previously. -
delete_guest 1
clear
undo(reverses theclearcommand)
undo(reverses thedelete_guest 1command)
3.23. Redoing the previously undone command : redo
Reverses the most recent undo command.
Format: redo
You should not enter any characters after the command word, only extra spaces are allowed! For example, the input redo extra_characters or redo 182$* will be incorrect, but redo (i.e. with spaces) will be correct.
|
Examples:
-
delete_guest 1
undo(reverses thedelete_guest 1command)
redo(reapplies thedelete_guest 1command) -
delete_guest 1
redo
Theredocommand fails as there are noundocommands executed previously. -
delete_guest 1
clear
undo(reverses theclearcommand)
undo(reverses thedelete_guest 1command)
redo(reapplies thedelete_guest 1command)
redo(reapplies theclearcommand)
3.24. Exiting the program : exit
Exits the program.
Format: exit
You should not enter any characters after the command word, only extra spaces are allowed! For example, the input exit extra_characters or exit 182$* will be incorrect, but exit (i.e. with spaces) will be correct.
|
3.25. Saving your data
The guest list data are saved in the hard disk automatically after any command that changes the data.
There is no need for you to save your data manually.
4. FAQ
Q: How do I transfer my data to another Computer?
A: Install the app in the other computer and overwrite the empty data file it creates with the file that contains the data of your previous guest list.
Alternatively, you can export the data from your current computer using the export command. Using this data, you can launch the application on a different computer and import the data.
Q: How do I import my existing data on a CSV into the application?
A: Firstly, create a new event within the application. After this, use the import function and specify the path to the file.
You will see the guest list populate itself with the data from the specified CSV file.
5. Enabling Email Services
In order for you to use the commands email, emailAll, and emailSpecific you must allow Invités to access your email account and
send emails. Currently, our application only supports Gmail accounts, but we do plan on supporting other email domains.
If you do have a Gmail account, please follow these steps to enable email services:
-
Login to your Gmail account using your preferred online browser (e.g. Chrome, Firefox).
-
Click on your profile picture on the top right, and click on
Google Account -
Once you are re-directed, under the
Sign-in and securitysection, click onApps with account access -
Scroll down till you find the section
Allow less secure appson the right. Set this option toON. -
You are now ready to send emails to your guests through Invités!
| Currently there is no other way to enable mailing services than to let your Gmail account allow less secure apps. However, our team is working quickly to find a more secure replacement. |
| If your operating system is macOS Mojave, please make an important note of the following: |
-
If you use any of the email-related commands (i.e. email, emailAll or emailSpecific), you will be presented with an EmailWindow similar to the one in Figure 5.
-
If you use the command-tab keys when the EmailWindow is open to switch windows, the application will crash. This is due to Apple’s latest macOS release, in which some of the bindings are not compatible with key JavaFX functions.
-
This issue does not occur on Windows, Linux, and older macOS systems, however it may still exist in other operating systems we have not tested on.
-
We sincerely apologise for the inconvenience caused, and our team is quickly trying to fix this issue.
For testing purposes, you may use a default Gmail account we have created to save you some time: |
Email Address: invitestestpe1@gmail.com |
Password: practicalexam1 |
6. CSV Guest List Format
The import and export command will only work with CSV files satisfying a predefined format. To create valid CSV files, guests fields must be in the following format below and each guest’s details must be entered on a new line.
Format: NAME,PHONE_NUMBER,EMAIL,PAYMENT_STATUS,ATTENDANCE,UID,[TAG]
|
Individual guest fields shall not contain any commas. |
Example: sample CSV file
7. Command Summary
-
help: Displays a help sheet containing useful commands. -
add_guest: Creates an entry containing the details of a guest attending the event. -
edit_guest: Modifies the entry of a specified guest based on index. -
delete_guest: Removes an entry of a specified guest based on index. -
removeTag: Removes a set of tags from all the guests in the current list. -
addTag: Adds a set of tags to all the guests in the current list. -
find: Finds guests whose names, phone numbers or email addresses contain any of the given keywords. -
list: Lists the current guest list. -
import: Automatically generates and displays the guest list from a given CSV file. -
export: Exports the current guest list to a CSV file. -
mark: Tags a guest to note that they are currently at the event. -
unmark: Tags a guest to note that they are currently absent at the event. -
filter: Filters the guest list based on keywords given. -
email: Sends individual emails to a guest based on the index specified. -
emailAll: Sends an email to all of the guests in the current list. -
emailSpecific: Sends an email to all guests with the specified tags. -
add_event: Adds the details of your event. -
edit_event: Edits the details of your event. -
delete_event: Removes your event details. -
undo: Restores the application to the state before the previous undoable command was executed. -
redo: Reverses the most recent undo command. -
exit: Exits the application.